1. Preface
|
|
2. About this manual
2.1. Language
3. Product overview
3.1. Intended use
3.2. Product description
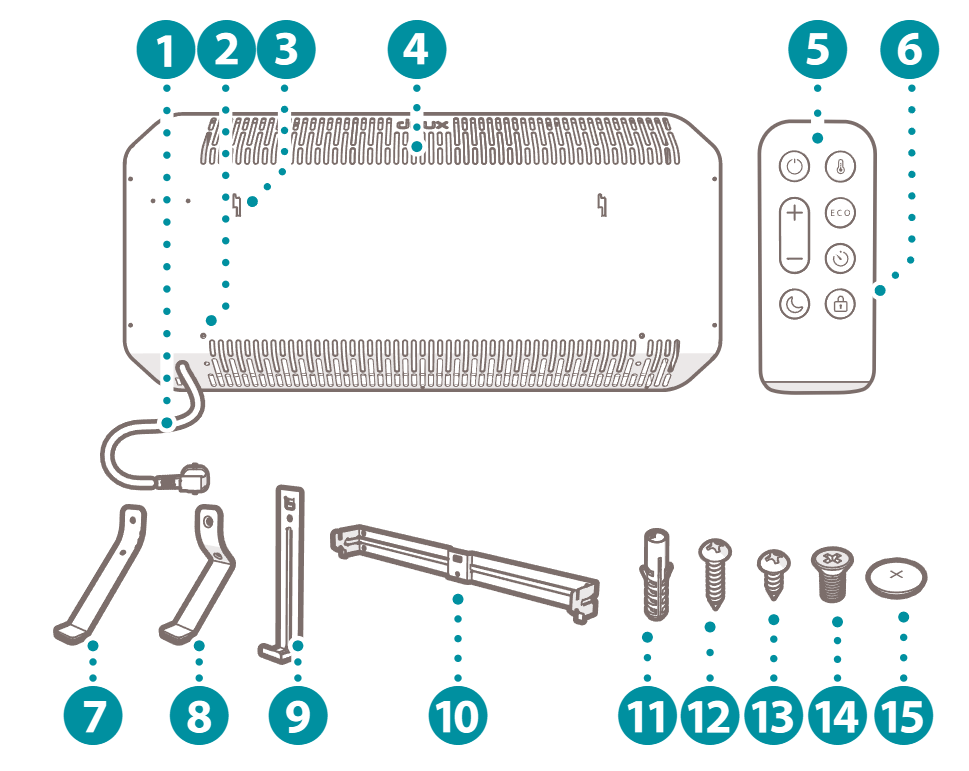
3.3. Main parts
|
|
3.4. Controls

|
|
4. Safety instructions
4.1. Signal words in this manual
4.2. Symbols on the product
|
|
|
|

|
|

|
|

|
|
|
|

|
|

|
|

|
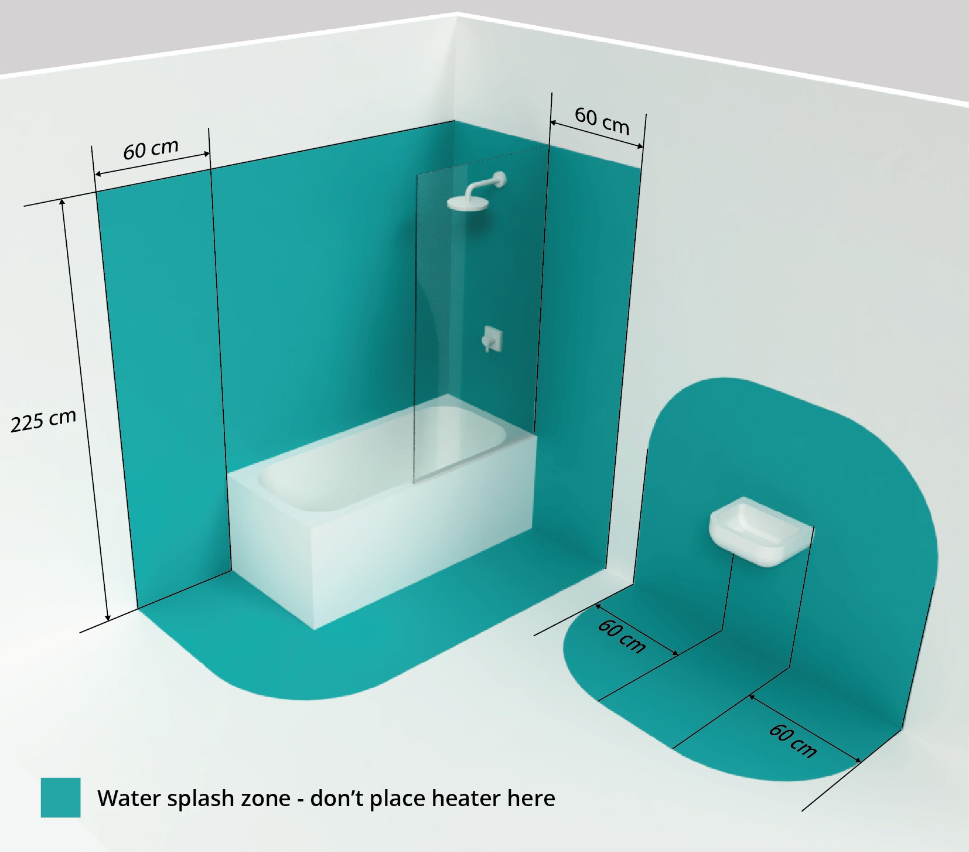
4.3. Safety warnings and regulations
5. Installation
|
5.1. Installing the product standing upright
|
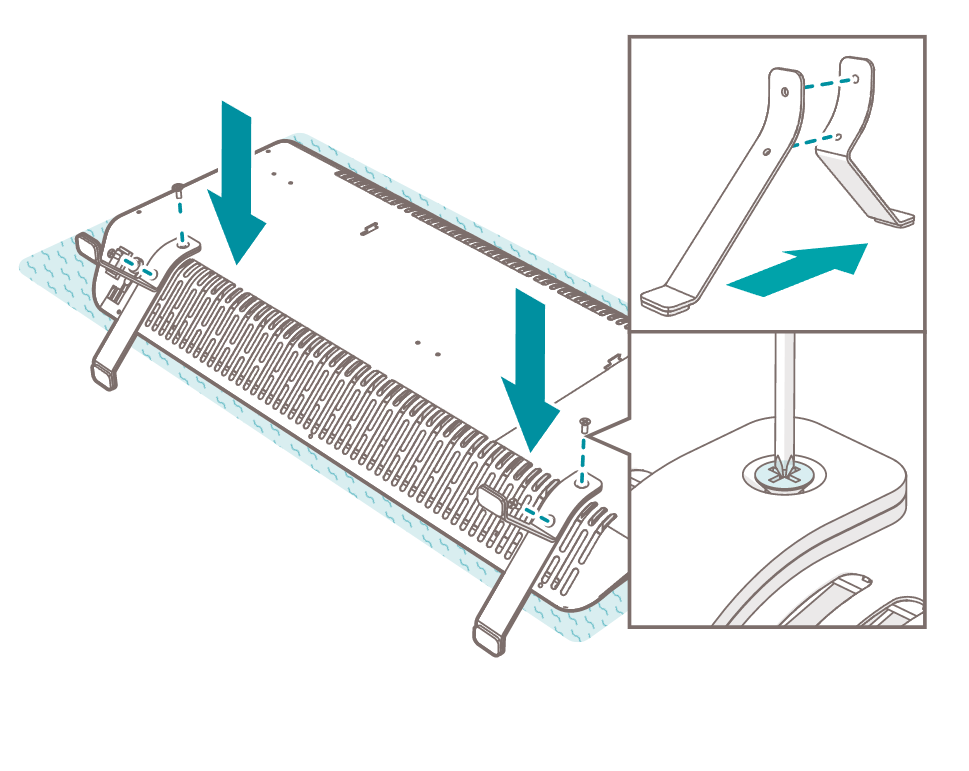
1. Carefully place the product front facing down on a flat surface. Place a soft cloth under the product to avoid scratches.
2. Align the front foot 7 and back foot 8 together.
3. Align the floor stands 7 8 with the floor stand holes 2 .
4. Attach the floor stands 7 8 to the product with the four provided bolts t using a Phillips head screwdriver.
5.2. Installing the product on the wall
|
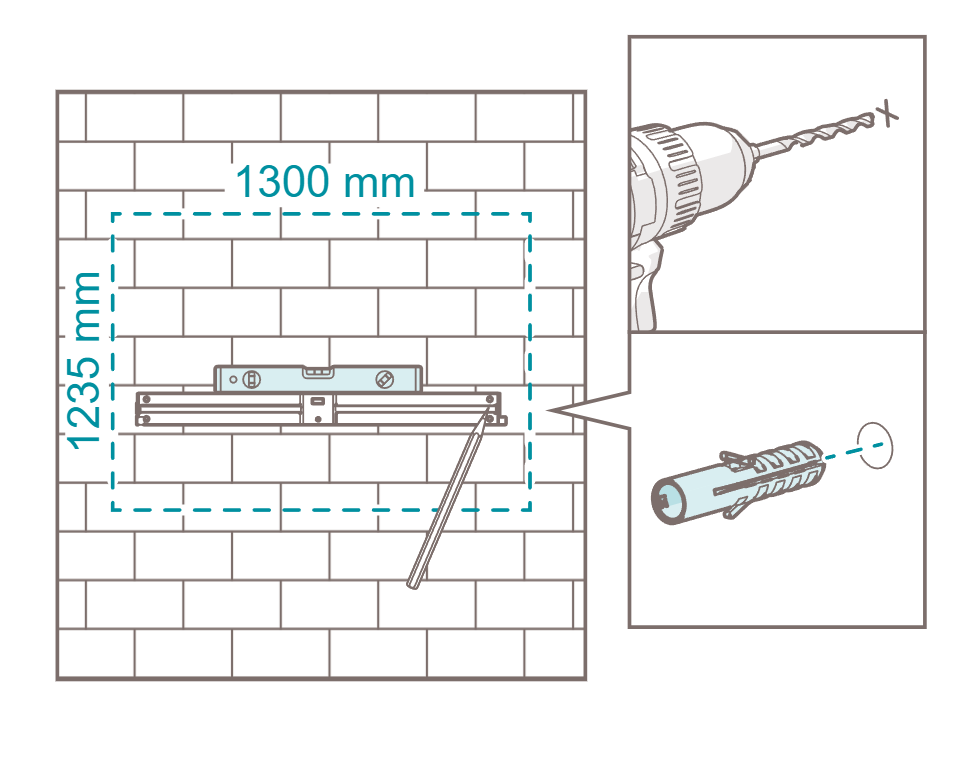
1. Choose a location with a minimum space of 1235 (h) × 1300 (w) nearby a grounded wall outlet.
2. Place the horizontal mounting bracket q on the wall.
3. Level the horizontal mounting bracket q with a spirit level.
4. Mark the 4 holes for the horizontal mounting bracket q with a pencil.
5. Drill the holes using an impact drill with a 6 mm drill bit.
6. Insert the provided plugs w into the drilled holes.
|
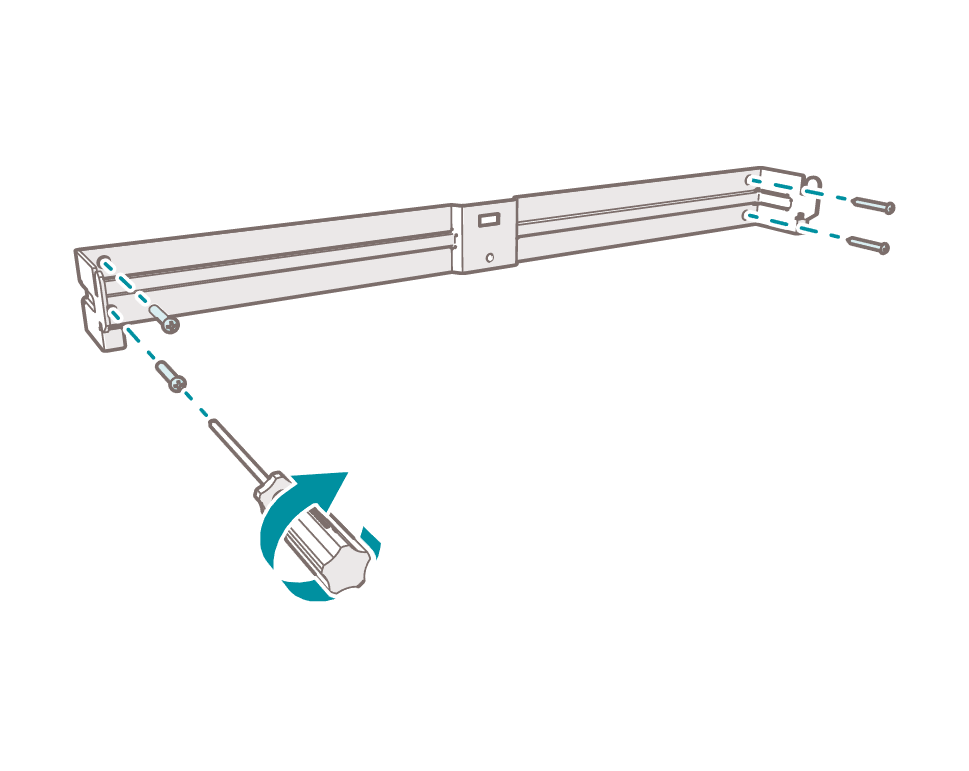
7. Align the horizontal mounting bracket q with the holes in the wall.
8. Attach the horizontal mounting bracket q to the wall with the four provided screws e using a Phillips head screwdriver.
|
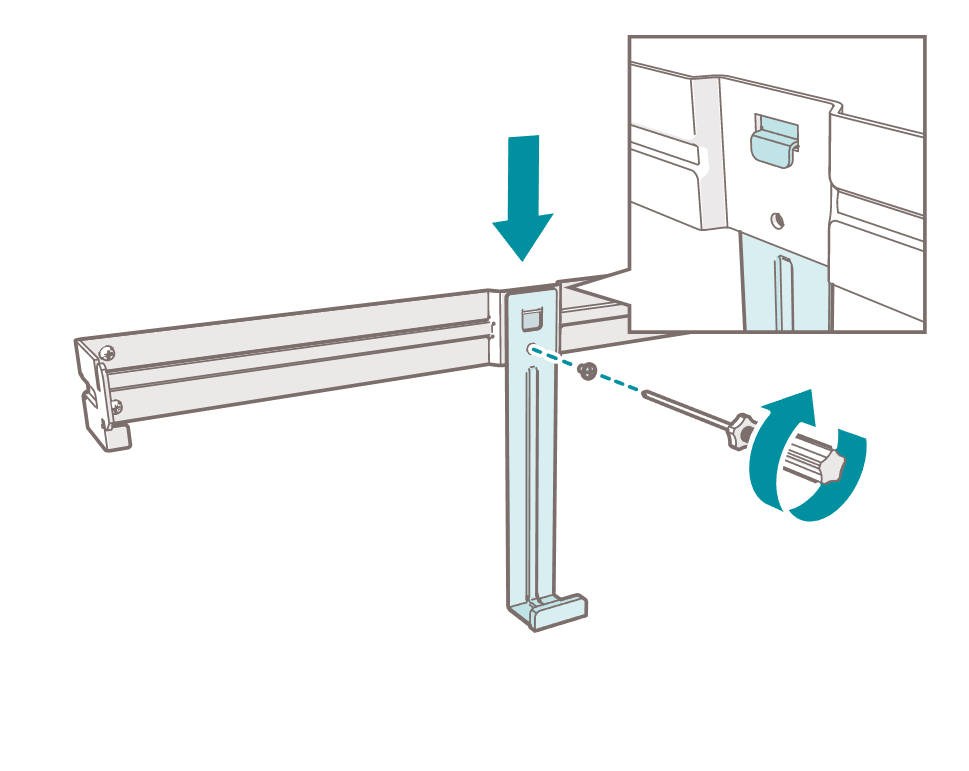
9. Align the vertical mounting bracket 9 with the hole in the horizontal mounting bracket q .
10. Attach the vertical mounting bracket 9 to the horizontal mounting bracket q with the provided screw r using a Phillips head screwdriver.
|
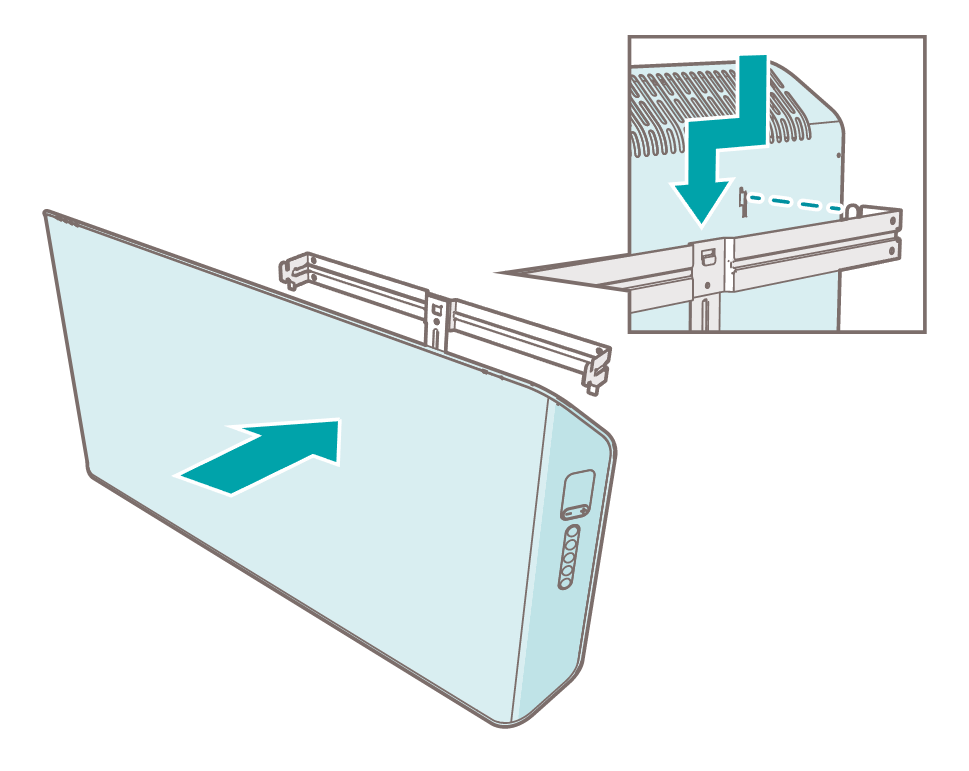
11. Align the mounting bracket slots 3 with the horizontal mounting bracket q . Place the product on the mounting brackets 9 q .
5.3. Placing the battery in the remote control
|
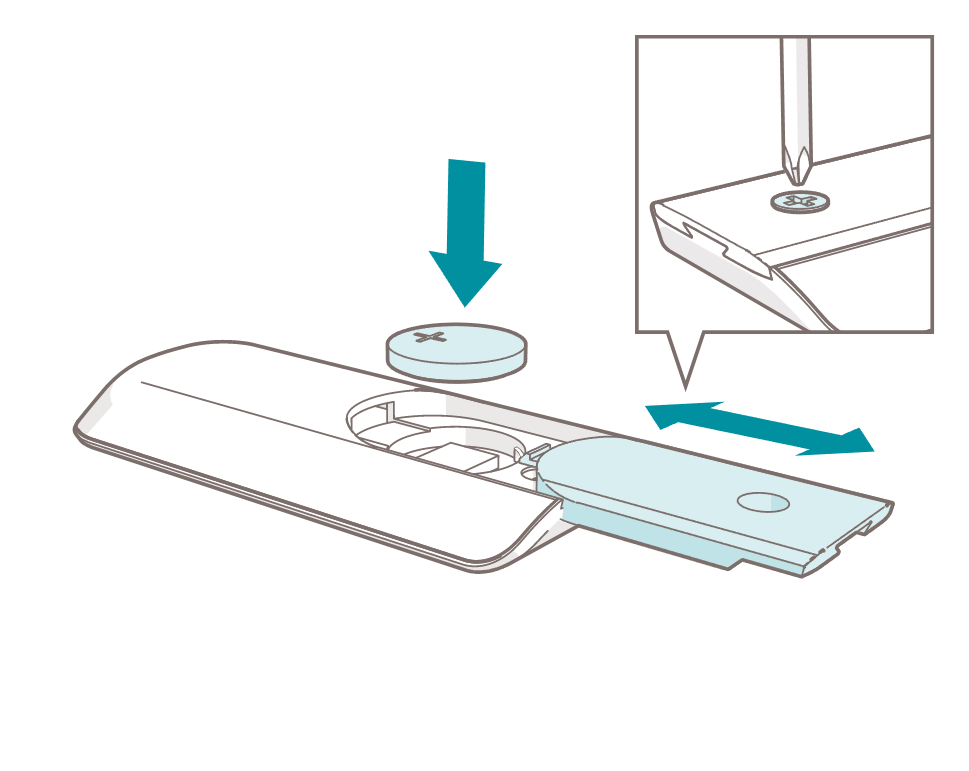
1. Open the battery compartment 6 with a Phillips head screwdriver.
2. Insert the cell battery y .
3. Close the battery compartment 6 with a Phillips head screwdriver.
6. Use
6.1. Switching on the product

|
6.2. Installing the Duux app

|
6.3. Connecting the product to Wi-Fi
1. Ensure the product is in standby mode.
2. Press and hold the Wi-Fi function button g for 5 seconds.
3. Tap the plus icon (+) in the Duux app.
4. Search for your Duux product and tap Continue.
5. Follow the instructions in the app on how to complete the pairing process.
6.4. Using the product
|
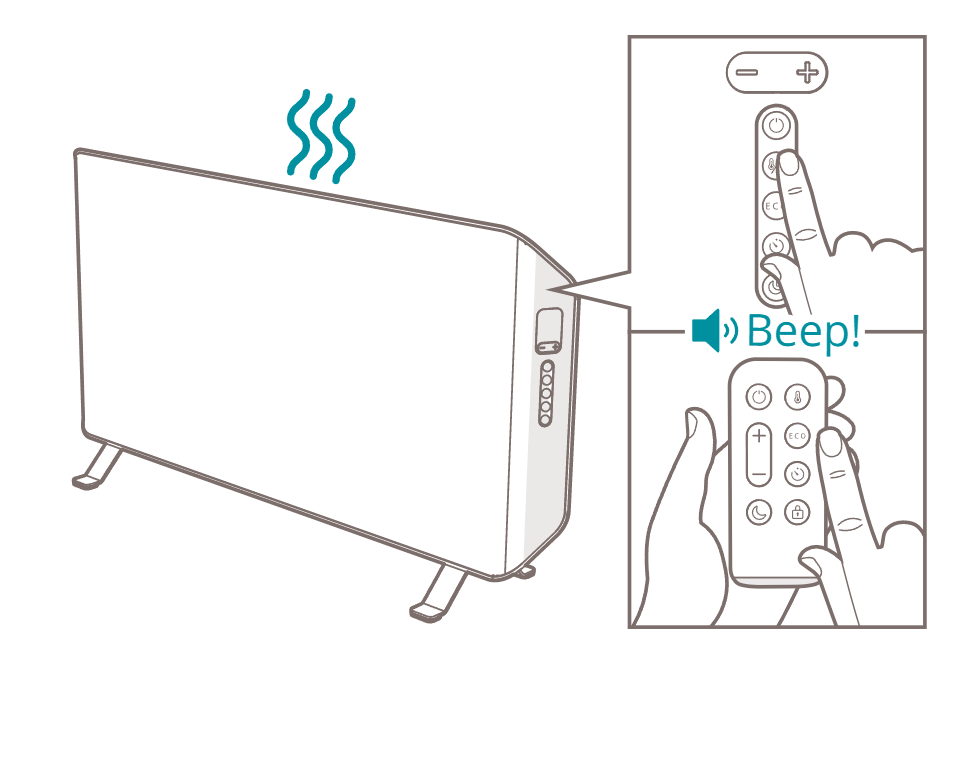
1. Press the power button p to switch on the product.
2. Choose a desired heating mode with the Duux app, the remote control, or control panel.

|
||

|
||

|
||
|
|
||
|
|
6.5. Switching off the product
3. Press the power button p to switch off the product.
4. Remove the power cord 1 from the power outlet.
7. Maintenance
7.1. Cleaning
|
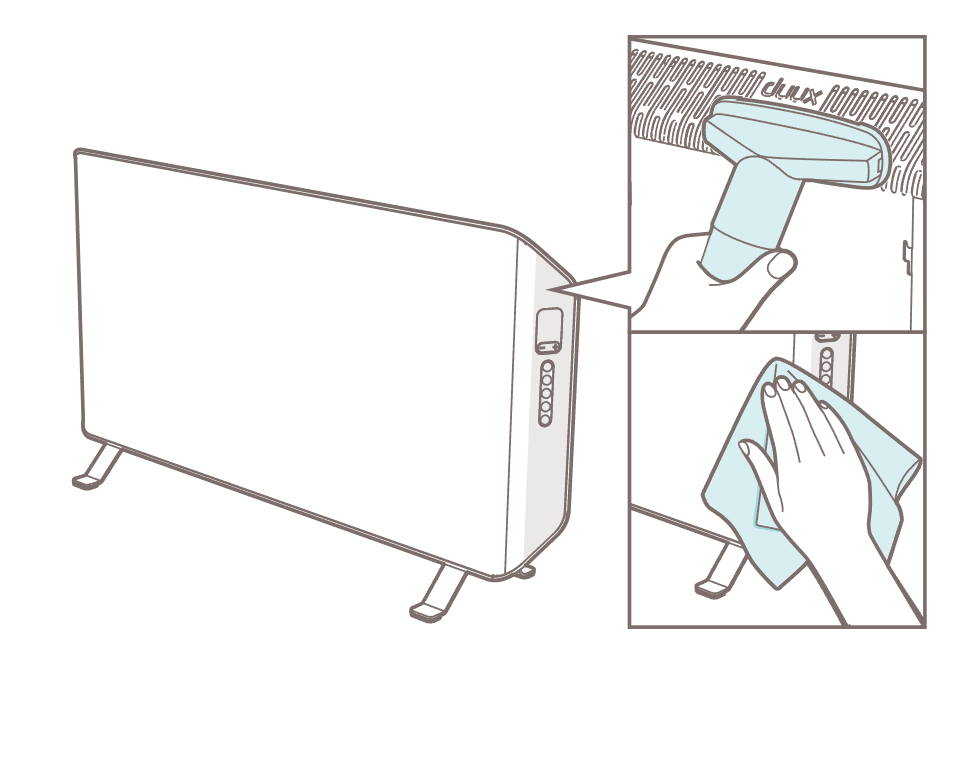
5. Clean the air inlet/outlet 4 with a vacuum cleaner.
6. Clean the outside of the product with a soft, slightly damp cloth.
7. Dry the outside of the product with a soft, dry cloth.
7.2. Storing
7.3. Spare parts
8. FAQ
|
|
||
|
|
9. Warranty
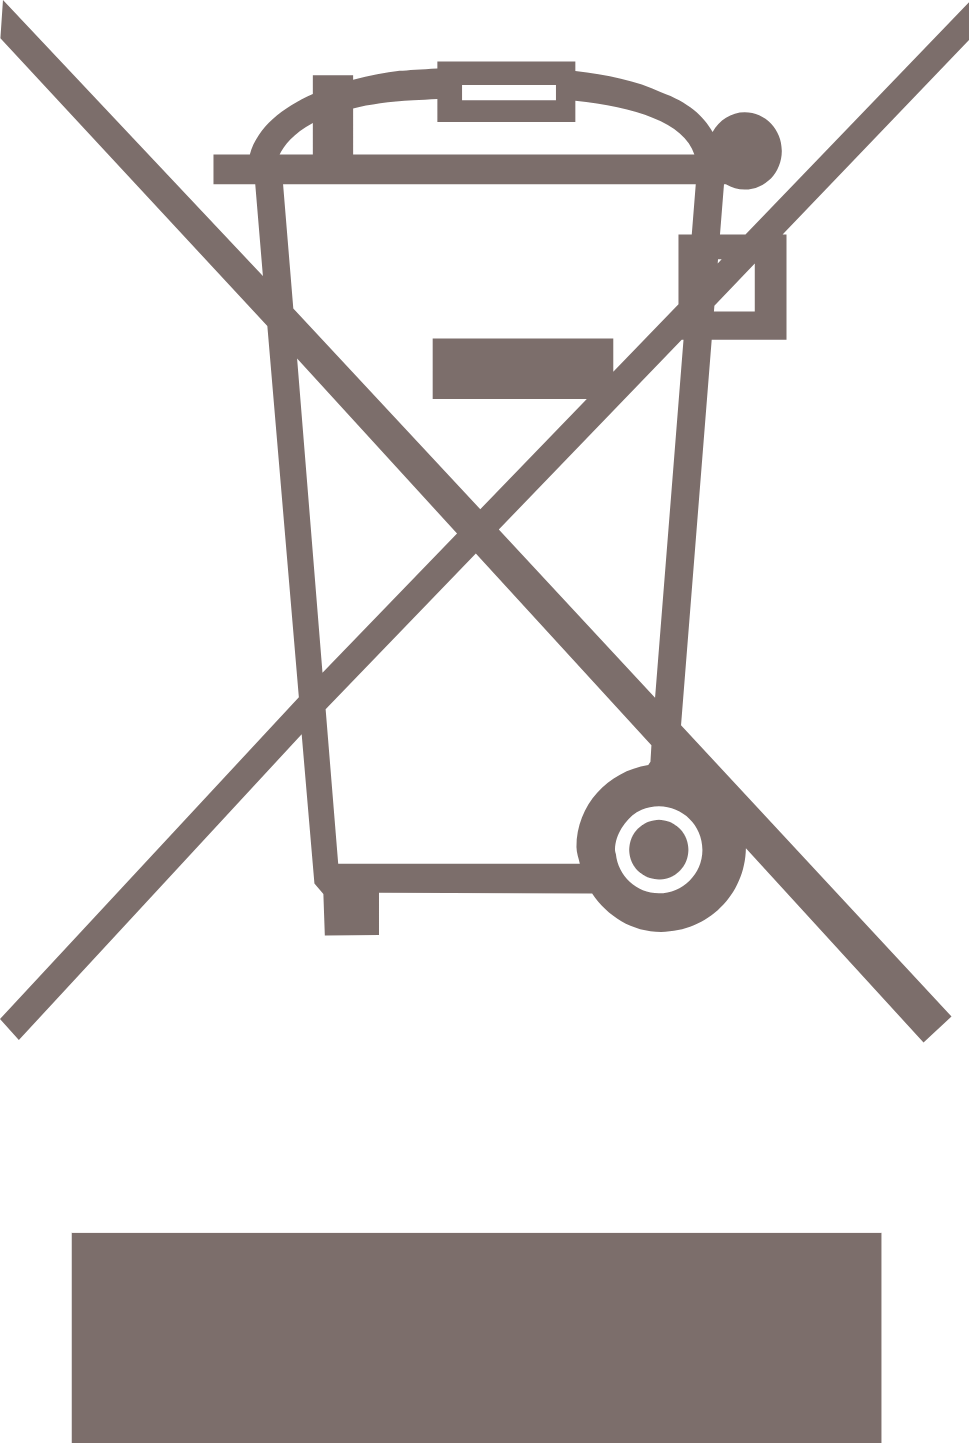
10. Disposal
11. Technical specifications

|
||||

|
||||

|
||||

|
||||

|
||||

|
||||

|
||||

|
||||
|
|
||||
12. Simplified EU declaration of conformity
1. Voorwoord
|
|
2. Over deze handleiding
2.1. Taal
3. Productoverzicht
3.1. Beoogd gebruik
3.2. Beschrijving van het product
3.3. Belangrijkste onderdelen
|
|
|
3.4. Bedieningselementen
|
|
|
4. Veiligheidsvoorschriften
4.1. Signaalwoorden in deze handleiding
4.2. Symbolen op het product
|
|
|
|
|
|
|
|
|
|
|
|
|
|
|
|
|
|
|
|
|
|
|
|
|
|
4.3. Veiligheidswaarschuwingen en -voorschriften
5. Installatie
|
|
5.1. Het product rechtop installeren
|
|
1. Plaats het product voorzichtig met de voorkant naar beneden op een vlakke ondergrond. Leg een zachte doek onder het product om krassen te voorkomen.
2. Breng de voorste voet 7 en de achterste voet 8 op één lijn.
3. Breng de vloerstandaarden 7 8 op één lijn met de gaten voor de vloerstandaard 2 .
4. Bevestig de vloerstandaarden 7 8 met de schroeven aan het product t met behulp van een kruiskopschroevendraaier.
5.2. Installatie van het product aan de muur
|
|
1. Kies een plaats met een minimale ruimte van 1235 (h) × 1300 (b) mm in de buurt van een geaard stopcontact.
2. Plaats de horizontale bevestigingsbeugel q tegen de muur.
3. Zet de horizontale montagebeugel q recht met behulp van de waterpas.
4. Markeer de vier boorgaten voor de horizontale bevestigingsbeugel q met een potlood.
5. Boor de gaten met behulp van de klopboormachine met een 6mm boor.
6. Steek de meegeleverde pluggen w in de geboorde gaten.
|
|
7. Lijn de horizontale bevestigingsbeugel q uit met de gaten in de muur.
8. Bevestig de horizontale bevestigingsbeugel q met de vier meegeleverde schroeven e aan de muur met behulp van een kruiskopschroevendraaier.
|
|
9. Lijn de verticale bevestigingsbeugel 9 uit met het gat in de horizontale bevestigingsbeugel q .
10. Bevestig de verticale bevestigingsbeugel 9 met de meegeleverde schroef r aan de horizontale beugel q met behulp van een kruiskopschroevendraaier.
|
|
11. Lijn de sleuven in de bevestigingsbeugel 3 uit met de horizontale bevestigingsbeugel q . Plaats het product op de bevestigingsbeugels 9 q .
5.3. De batterij in de afstandsbediening plaatsen
|
|
1. Open het batterijvak 6 met een kruiskopschroevendraaier.
2. Plaats de celbatterij y .
3. Sluit het batterijvak 6 met een kruiskopschroevendraaier.
6. Gebruik
6.1. Het product inschakelen
|
|
6.2. Installeren van de Duux-app
|
|
6.3. Het product verbinden met wifi
1. Controleer of het product in stand-bymodus staat.
2. Houd de wifi-knop g 5 seconden ingedrukt.
3. Tik op het plus-pictogram (+) in de Duux-app.
4. Zoek je Duux-product en tik op Doorgaan.
5. Volg de instructies in de app om de verbindingsprocedure te voltooien.
6.4. Gebruik van het product
|
|
1. Druk op de aan/uit-knop p om het product in te schakelen.
2. Kies een gewenste verwarmingsmodus met de Duux-app, de afstandsbediening of het bedieningspaneel.
|
|
||
|
|
||
|
|
||
|
|
||
|
|
6.5. Het product uitschakelen
3. Druk op de aan/uit-knop p om het product uit te schakelen.
4. Haal de stekker 1 uit het stopcontact.
7. Onderhoud
7.1. Reinigen
|
|
5. Reinig de luchtinlaat/-uitlaat 4 met een stofzuiger.
6. Reinig de buitenkant van het product met een zachte, licht vochtige doek.
7. Droog de buitenkant van het product af met een zachte, droge doek.
7.2. Opslag
7.3. Reserveonderdelen
8. Veelgestelde vragen
|
|
||
|
|
9. Garantie
10. Afvoer
11. Technische specificaties
|
|
||||
|
|
||||
|
|
||||
|
|
||||
|
|
||||
|
|
||||
|
|
||||
|
|
||||
|
|
||||
12. Vereenvoudigde EU-conformiteitsverklaring
1. Vorwort
|
|
2. Über dieses Handbuch
2.1. Sprache
3. Produktübersicht
3.1. Bestimmungsgemäße Verwendung
3.2. Produkt-Beschreibung
3.3. Zentrale Bestandteile
|
|
|
3.4. Steuerung
|
|
|
4. Sicherheitshinweise
4.1. Signalwörter in diesem Handbuch
4.2. Symbole auf dem Produkt
|
|
|
|
|
|
|
|
|
|
|
|
|
|
|
|
|
|
|
|
|
|
|
|
|
|
4.3. Sicherheitshinweise und Vorschriften
5. Installation
|
|
5.1. Installiere das Produkt in aufrechter Position
|
|
1. Lege das Produkt vorsichtig mit der Vorderseite nach unten auf eine ebene Fläche. Lege ein weiches Tuch unter das Produkt, um Kratzer zu vermeiden.
2. Richte den vorderen Fuß 7 und den hinteren Fuß 8 zusammen aus.
3. Richte die Bodenständer 7 8 an den Löchern für die Bodenständer 2 aus.
4. Befestige die Bodenständer 7 8 mit den vier mitgelieferten Bolzen t und einem Kreuzschlitz-Schraubendreher am Produkt.
5.2. Das Produkt an der Wand installieren
|
|
1. Wähle einen Standort mit mindestens 1235 (H) × 1300 (B) Platz in der Nähe einer geerdeten Wandsteckdose.
2. Halte die horizontale Montagehalterung q an die Wand.
3. Richte die horizontale Halterung q mithilfe einer Wasserwaage aus.
4. Markiere die 4 Löcher für die horizontale Montagehalterung q mit einem Bleistift.
5. Mit der Schlagbohrmaschine und einem 6 mm Bohrer bohrst du jetzt die Löcher in die Wand.
6. Setze die mitgelieferten Dübel w in die Bohrlöcher ein.
|
|
7. Richte die horizontale Montagehalterung q an den Löchern in der Wand aus.
8. Befestige die horizontale Montagehalterung q mit den vier mitgelieferten Schrauben e und einem Kreuzschlitz-Schraubendreher an der Wand.
|
|
9. Richte die Löcher in der vertikalen Montagehalterung 9 am Loch in der horizontalen Montagehalterung q aus.
10. Befestige die vertikale Montagehalterung 9 mit der vorhandenen Schraube r und einem Kreuzschlitz-Schraubendreher an der horizontalen Halterung q .
|
|
11. Richte die Öffnungen in der Montagehalterung 3 an der horizontalen Montagehalterung q aus. Lases das Produkt in die Montagehalterungen 9 q einrasten.
5.3. Die Batterie in die Fernbedienung einlegen
|
|
1. Öffne das Batteriefach 6 mit einem Kreuzschlitz-Schraubendreher.
2. Lege die Akkuzelle y ein.
3. Schließe das Batteriefach 6 mit einem Kreuzschlitz-Schraubendreher.
6. Verwendung
6.1. Das Produkt einschalten
|
|
6.2. Installation der Duux-App
|
|
6.3. Das Produkt mit dem WLAN verbinden
1. Achte darauf, dass sich das Produkt im Standby-Modus befindet.
2. Halte die WLAN-Taste g 5 Sekunden lang gedrückt.
3. Tippe auf das Plus-Symbol (+) in der Duux-App.
4. Suche nach deinem Duux-Produkt und tippe auf Weiter.
5. Folge den Anweisungen in der App, um den Kopplungsvorgang abzuschließen.
6.4. Das Produkt verwenden
|
|
1. Drücke die Taste Ein/Aus p , um das Produkt einzuschalten.
2. Über die Duux App, die Fernbedienung oder das Bedienfeld wählst du den gewünschten Heizmodus aus.
|
|
||
|
|
||
|
|
||
|
|
||
|
|
6.5. Das Produkt ausschalten
3. Drücke die Taste Ein/Aus p , um das Produkt auszuschalten.
4. Ziehe das Netzkabel 1 aus der Steckdose.
7. Wartung und Pflege
7.1. Reinigung
|
|
5. Reinige den Lufteinlass/Auslass 4 mit einem Staubsauger.
6. Reinige die Außenseite des Produkts mit einem weichen, leicht feuchten Tuch.
7. Trockne die Außenseite des Produkts mit einem weichen, trockenen Tuch ab.
7.2. Lagerung
7.3. Ersatzteile
8. FAQ
|
|
||
|
|
9. Garantie
10. Entsorgung
11. Technische Angaben
|
|
||||
|
|
||||
|
|
||||
|
|
||||
|
|
||||
|
|
||||
|
|
||||
|
|
||||
|
|
||||
12. Vereinfachte EU-Konformitätserklärung
1. Prefacio
|
|
2. Acerca de este manual
2.1. Idioma
3. Descripción general del producto
3.1. Uso previsto
3.2. Descripción del producto
3.3. Componentes principales
|
|
|
3.4. Controles
|
|
|
4. Instrucciones de seguridad
4.1. Palabras de advertencia en este manual
4.2. Símbolos del producto
|
|
|
|
|
|
|
|
|
|
|
|
|
|
|
|
|
|
|
|
|
|
|
|
|
|
4.3. Advertencias y normas de seguridad
5. Instalación
|
|
5.1. Instalación del aparato en posición vertical
|
|
1. Coloque con cuidado el aparato con la parte frontal hacia abajo sobre una superficie plana. Coloque un paño suave debajo del aparato para evitar arañazos.
2. Alinee el pie delantero 7 y el pie trasero 8 juntos.
3. Alinee los soportes de suelo 7 y 8 con los orificios de soporte de suelo 2 .
4. Fije los soportes de pie 7 8 al aparato con los cuatro pernos que se incluido t utilizando un destornillador Phillips.
5.2. Instalación del aparato en la pared
|
|
1. Elija una ubicación con un espacio mínimo de 1235 (alto) × 1300 (ancho) cerca de una toma de pared con toma de tierra.
2. Coloque el soporte de montaje en horizontal q en la pared.
3. Nivele el soporte de montaje en horizontal q con un nivel de burbuja.
4. Marque los 4 orificios del soporte de montaje horizontal q con un lápiz.
5. Haga los orificios con un taladro usando una broca de 6 mm.
6. Inserte los tapones suministrados w en los orificios taladrados.
|
|
7. Alinee el soporte de montaje horizontal q con los orificios de la pared.
8. Fije el soporte de montaje horizontal q a la pared con los cuatro tornillos incluidos e utilizando un destornillador Phillips.
|
|
9. Alinee el soporte de montaje vertical 9 con el orificio del soporte de montaje horizontal q .
10. Fije el soporte de montaje vertical 9 al soporte de montaje horizontal q con el tornillo incluido r utilizando un destornillador Phillips.
|
|
11. Alinee las ranuras del soporte de montaje 3 con el soporte de montaje horizontal q . Coloque el aparato en los soportes de montaje 9 q .
5.3. Instalación de la batería del control remoto
|
|
1. Abra el compartimento de la pila 6 con un destornillador Phillips.
2. Introduzca la pila y .
3. Cierre el compartimento de la pila 6 con un destornillador Phillips.
6. Uso
6.1. Encender el aparato
|
|
6.2. Instalación de la aplicación Duux
|
|
6.3. Conectar el aparato a la wifi
1. Compruebe que el aparato está en modo de espera.
2. Mantenga pulsado el botón de wifi g durante 5 segundos.
3. Toque el icono más (+) en la aplicación Duux.
4. Busque su producto Duux y pulse Continuar.
5. Siga las instrucciones indicadas en la aplicación para completar el proceso de emparejamiento.
6.4. Uso del producto.
|
|
1. Pulse el botón de encendido p para encender el aparato.
2. Elija el modo de calefacción deseado con la aplicación Duux, el mando a distancia o el panel de control.
|
|
||
|
|
||
|
|
||
|
|
||
|
|
6.5. Apagar el aparato
3. Mantenga pulsado el botón de encendido p para apagar el aparato.
4. Desconecte el cable de alimentación 1 de la toma de corriente.
7. Mantenimiento
7.1. Limpieza
|
|
5. Limpie la entrada/salida de aire 4 con un aspirador.
6. Limpie el exterior del aparato con un paño suave y ligeramente húmedo.
7. Seque el exterior del aparato con un paño suave y seco.
7.2. Conservación
7.3. Piezas de repuesto
8. Preguntas frecuentes
|
|
||
|
|
9. Garantía
10. Eliminación
11. Especificaciones técnicas
|
|
||||
|
|
||||
|
|
||||
|
|
||||
|
|
||||
|
|
||||
|
|
||||
|
|
||||
|
|
||||
12. Declaración de conformidad simplificada de la UE
1. Préface
|
|
2. À propos de ce manuel
2.1. Langue
3. Aperçu du produit
3.1. Utilisation prévue
3.2. Description du produit
3.3. Parties principales
|
|
|
3.4. Commandes
|
|
|
4. Consignes de sécurité
4.1. Mentions d’avertissement dans ce manuel
4.2. Symboles sur le produit
|
|
|
|
|
|
|
|
|
|
|
|
|
|
|
|
|
|
|
|
|
|
|
|
|
|
4.3. Avertissements de sécurité et réglementations
5. Installation de l’appareil
|
|
5.1. Installation du produit en position verticale
|
|
1. Placez soigneusement le produit, face avant vers le bas, sur une surface plane. Placez un chiffon doux sous le produit pour éviter les rayures.
2. Alignez le pied avant 7 et le pied arrière 8 ensemble.
3. Alignez les supports de sol 7 8 sur les trous des supports de sol 2 .
4. Fixez les supports de sol 7 8 au produit avec les quatre boulons fournis t à l’aide d’un tournevis cruciforme.
5.2. Installation du produit sur le mur
|
|
1. Choisissez un emplacement avec un espace minimum de 1235 (H) × 1300 (l) à proximité d’une prise murale avec mise à la terre.
2. Placez le support de montage horizontal q sur le mur.
3. Mettez le support de montage horizontal q à niveau à l’aide d’un niveau à bulle.
4. Marquez les quatre trous du support de montage horizontal q à l’aide d’un crayon.
5. Percez les trous à l’aide d’une perceuse à percussion avec un foret de 6 mm.
6. Insérez les chevilles fournies w dans les trous percés.
|
|
7. Alignez le support de montage horizontal q avec les trous du mur.
8. Fixez le support de montage horizontal q au mur avec les quatre vis fournies e à l’aide d’un tournevis cruciforme.
|
|
9. Alignez le support de montage vertical 9 avec le trou du support de montage horizontal q .
10. Fixez le support de montage vertical 9 au support de montage horizontal q avec la vis fournie r à l’aide d’un tournevis cruciforme.
|
|
11. Alignez les fentes du support de montage 3 avec le support de montage horizontal q . Placez le produit sur les supports de montage 9 q .
5.3. Placer la pile dans la télécommande
|
|
1. Ouvrez le compartiment à batterie 6 avec un tournevis cruciforme.
2. Insérez la batterie y .
3. Fermez le compartiment à batterie 6 avec un tournevis cruciforme.
6. Utilisation
6.1. Allumer le produit
|
|
6.2. Installation de l’application Duux
|
|
6.3. Connexion du produit du Wi-Fi
1. Assurez-vous que le produit est en mode veille.
2. Appuyez sur le bouton Wi-Fi g et maintenez-le enfoncé pendant 5 secondes.
3. Appuyez sur l’icône plus (+) dans l’application Duux.
4. Recherchez votre produit Duux et appuyez sur Continuer.
5. Suivez les instructions dans l’appli pour terminer le processus de couplage.
6.4. Utilisation du produit
|
|
1. Appuyez sur le bouton d’alimentation p pour allumer le produit.
2. Choisissez le mode de chauffage souhaité via l’appli Duux, la télécommande ou le panneau de commande.
|
|
||
|
|
||
|
|
||
|
|
||
|
|
6.5. Éteindre le produit
3. Appuyez sur le bouton d’alimentation p pour éteindre le produit.
4. Retirez le cordon d’alimentation 1 de la prise de courant.
7. Maintenance
7.1. Nettoyage
|
|
5. Nettoyez l’entrée/la sortie d’air 4 avec un aspirateur.
6. Nettoyez l’extérieur du produit avec un chiffon doux et légèrement humide.
7. Séchez l’extérieur du produit avec un chiffon doux et sec.
7.2. Stockage
7.3. Pièces de rechange
8. FAQ
|
|
||
|
|
9. Garantie
10. Élimination
11. Caractéristiques techniques
|
|
||||
|
|
||||
|
|
||||
|
|
||||
|
|
||||
|
|
||||
|
|
||||
|
|
||||
|
|
||||
12. Déclaration de conformité simplifiée de l’UE