1. Preface
|
|
2. About this manual
2.1. Language
3. Product overview
3.1. Intended use
3.2. Product description
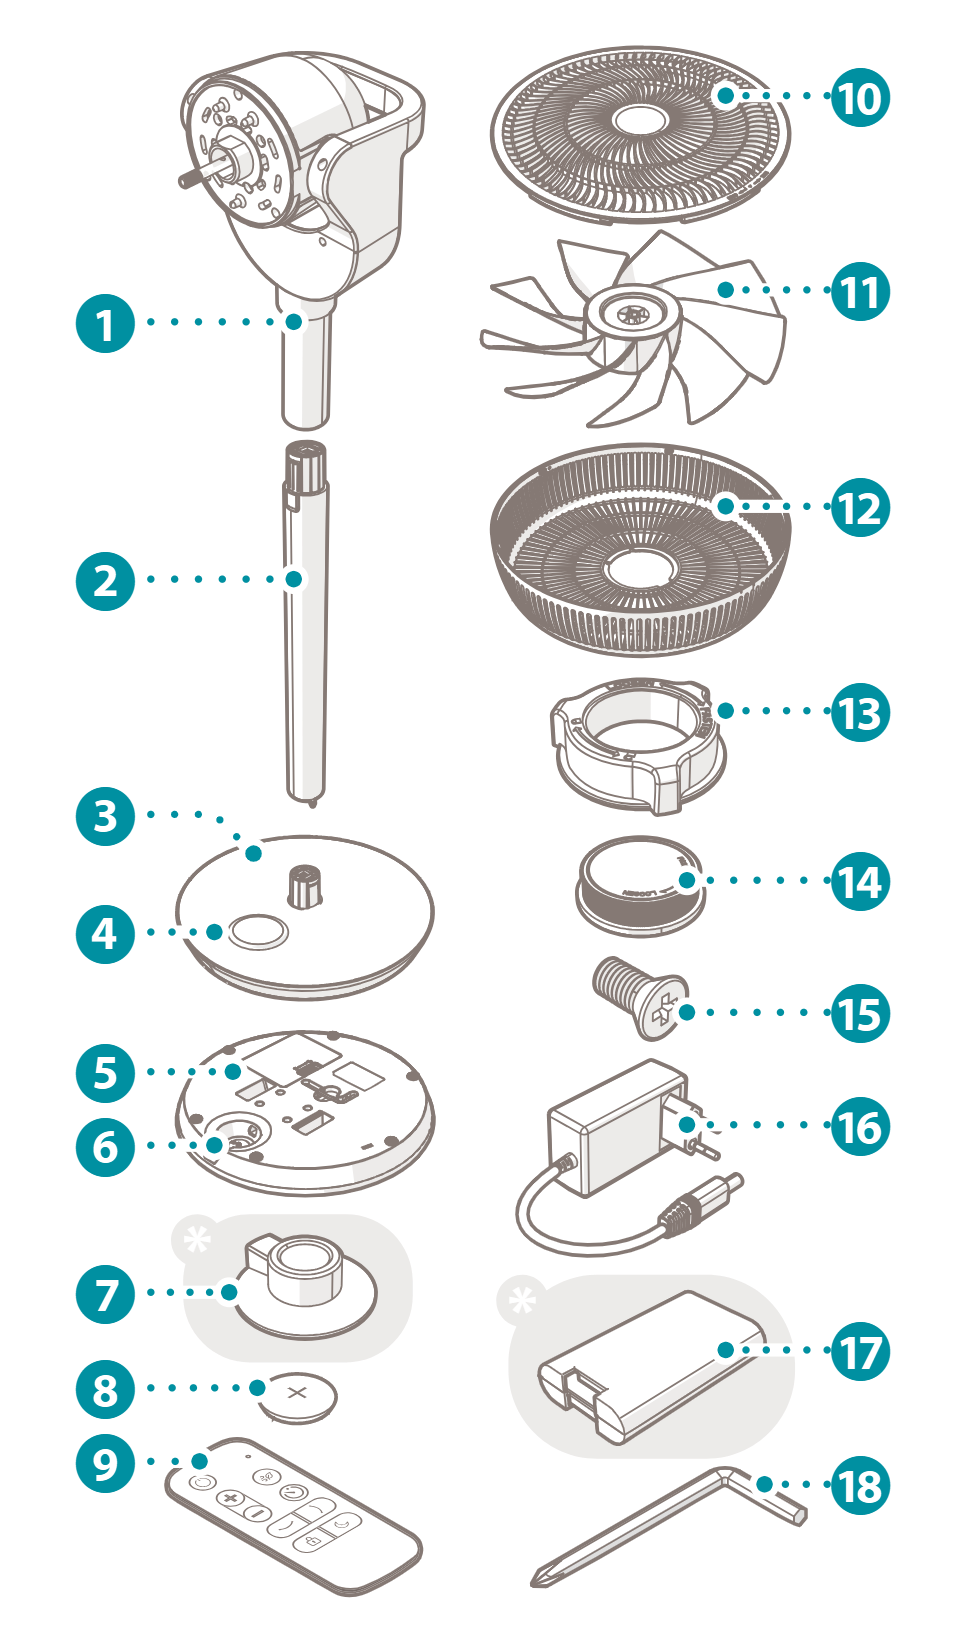
3.3. Main parts
|
|
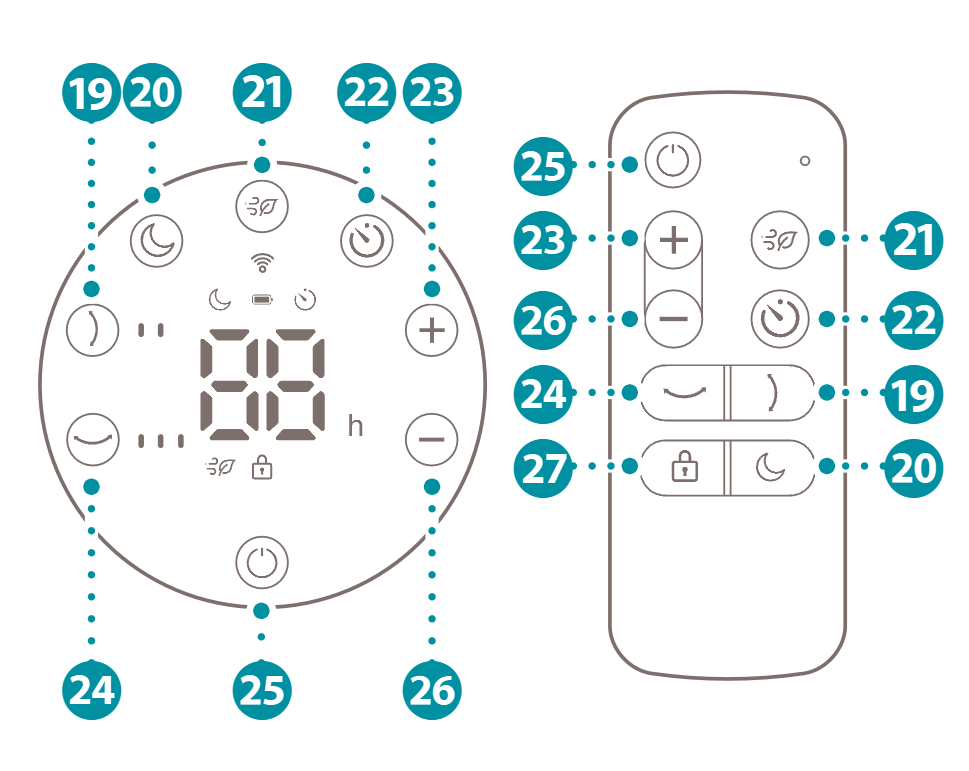
3.4. Controls
|
|
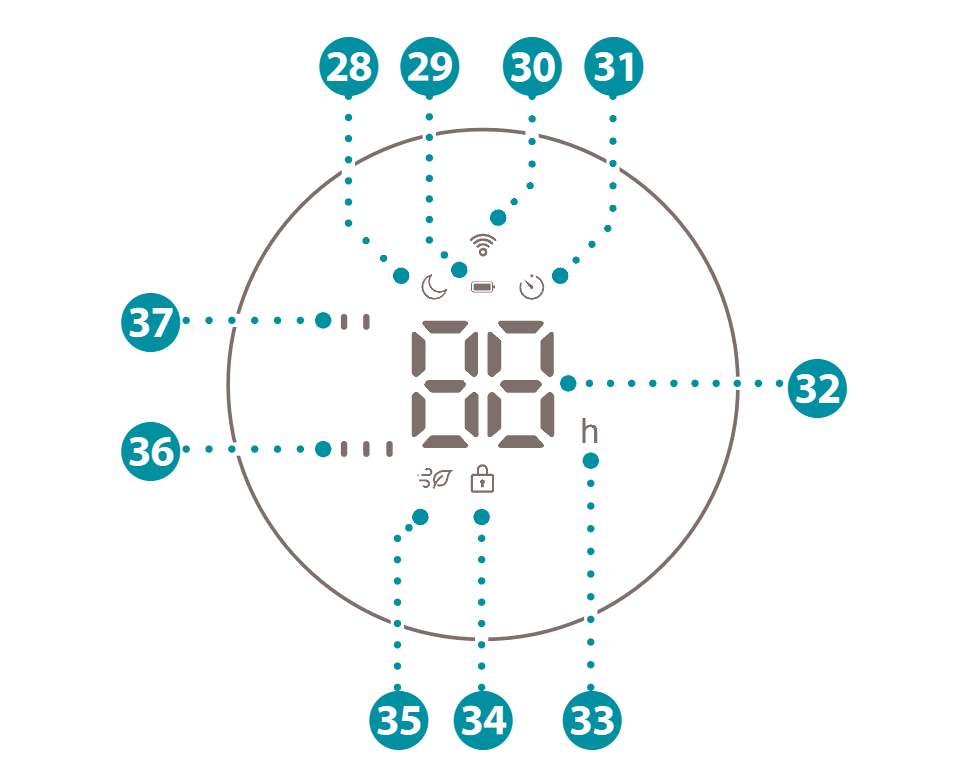
3.5. Display
|
|
4. Safety instructions
4.1. Signal words in this manual
4.2. Symbols on the product

|
|

|
|
|
|

|
|

|
4.3. Safety warnings and regulations
5. Installation
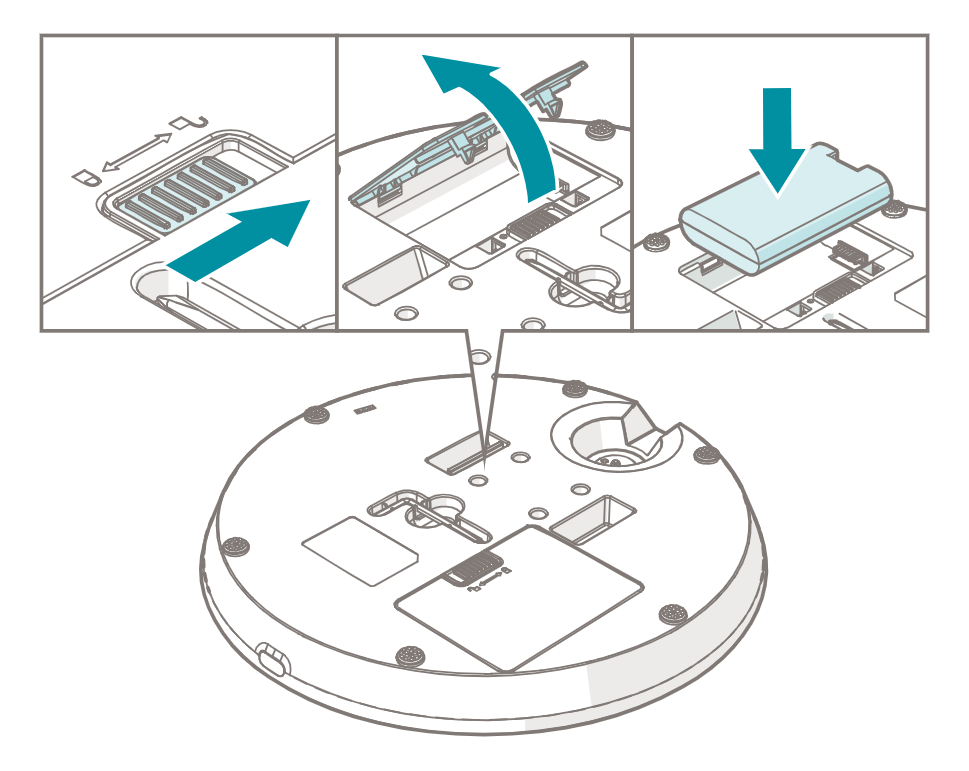
5.1. Installing the battery pack
|
1. Slide the lock button to the left to unlock the battery pack cover 5 .
2. Remove the battery pack cover 5 .
3. Insert the battery pack i .
4. Place battery pack cover 5 back. Slide back in place until you hear a click.
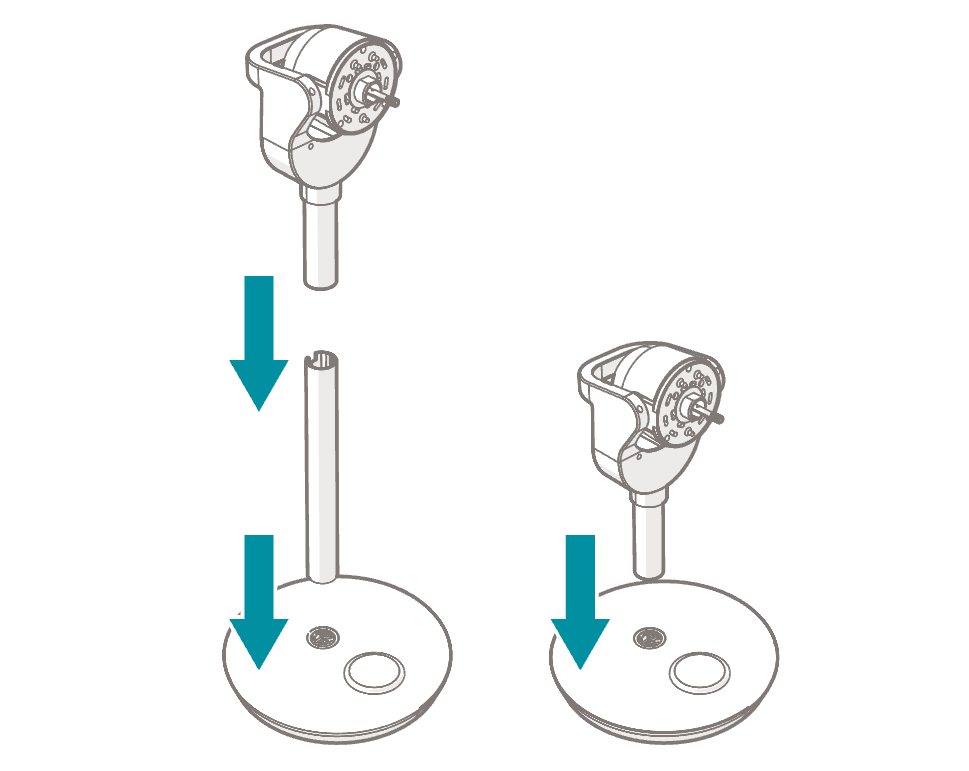
5.2. Installing the product
|
1. Choose one of the following product configurations:
|
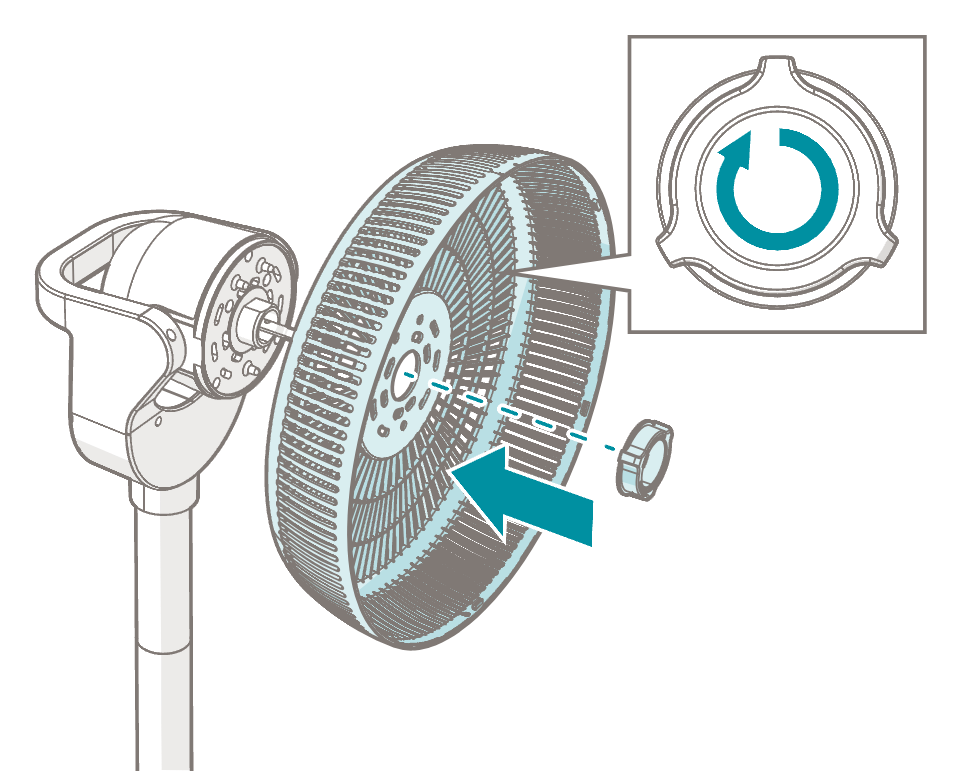
2. Place the rear grill e onto the motor unit 1 .
3. Secure the rear grill e with the locking ring r . Rotate the locking ring r clockwise.
|
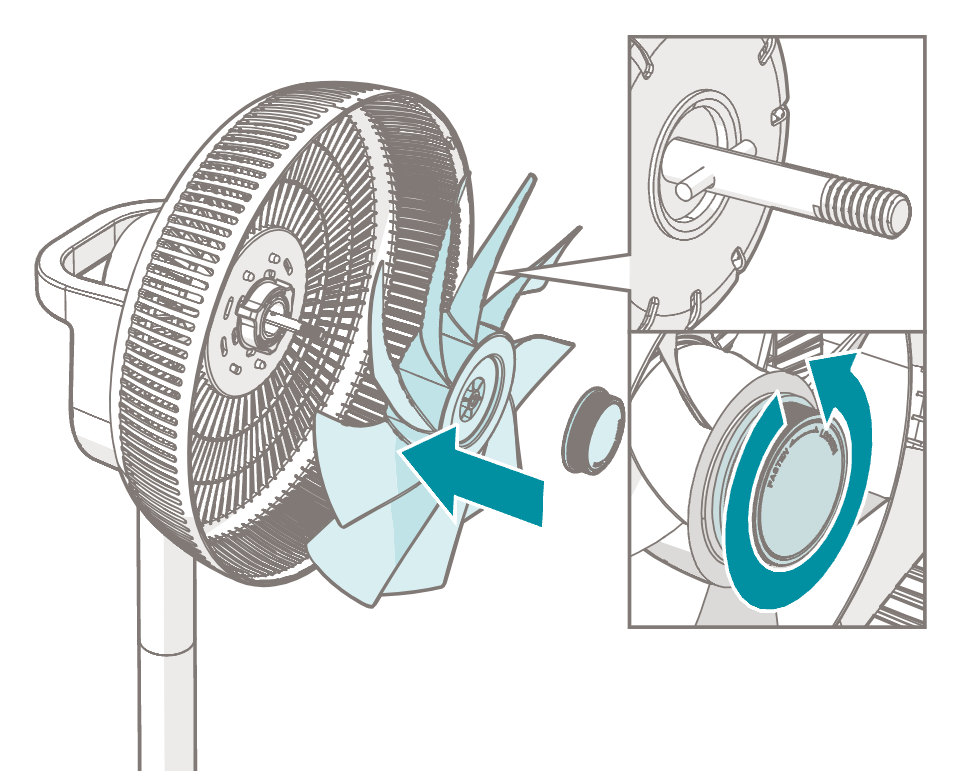
4. Place the fan blade w on the motor unit 1 .
5. Secure the fan blade w with the fan blade knob t . Rotate the fan blade knob t counterclockwise.
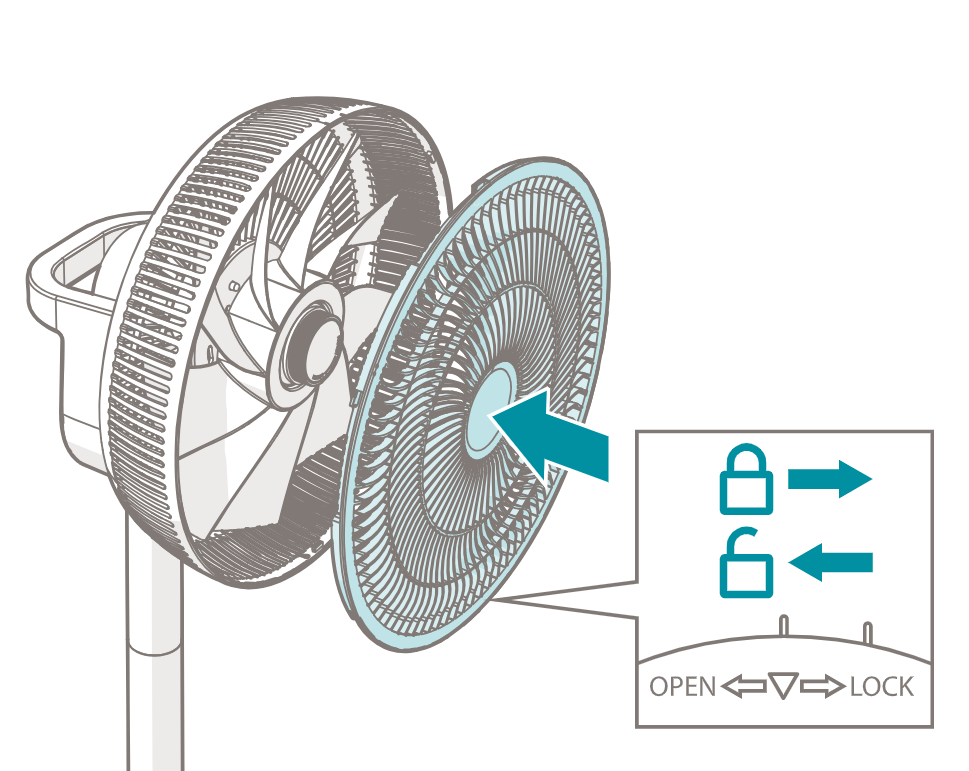
|
6. Align the triangle of the front grill q with the mark on the rear grill e .
7. Rotate the front grill q counterclockwise until the triangle aligns with the screw hole on the rear grill e .
|
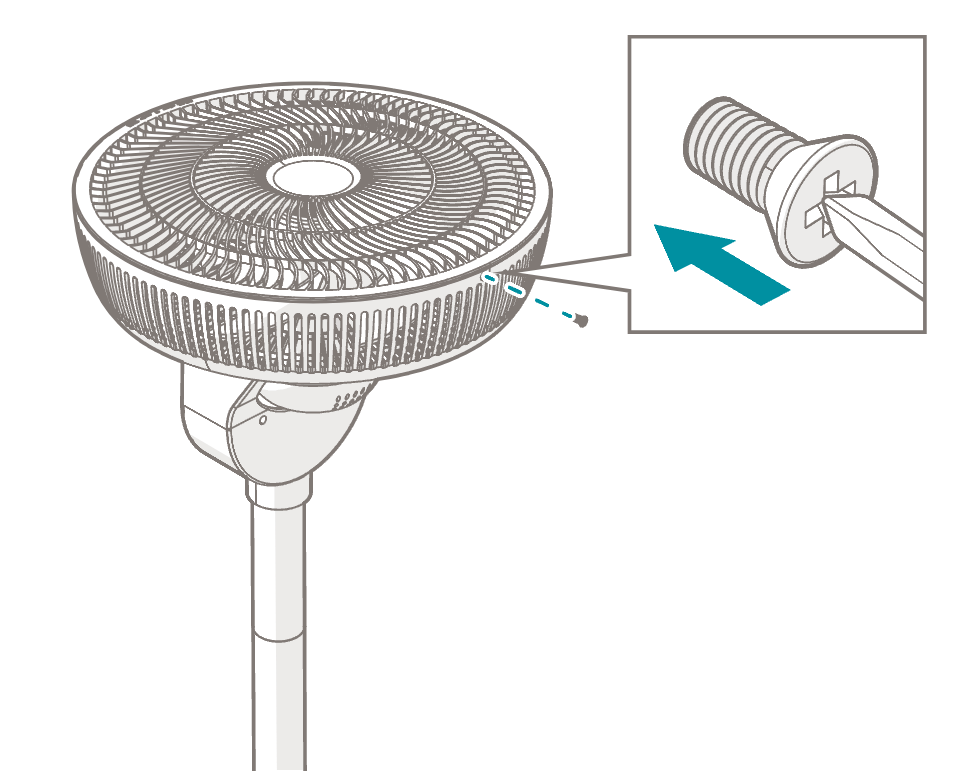
8. Secure the front grill q with the screw y using the screwdriver o .
5.3. Installing the remote control
|
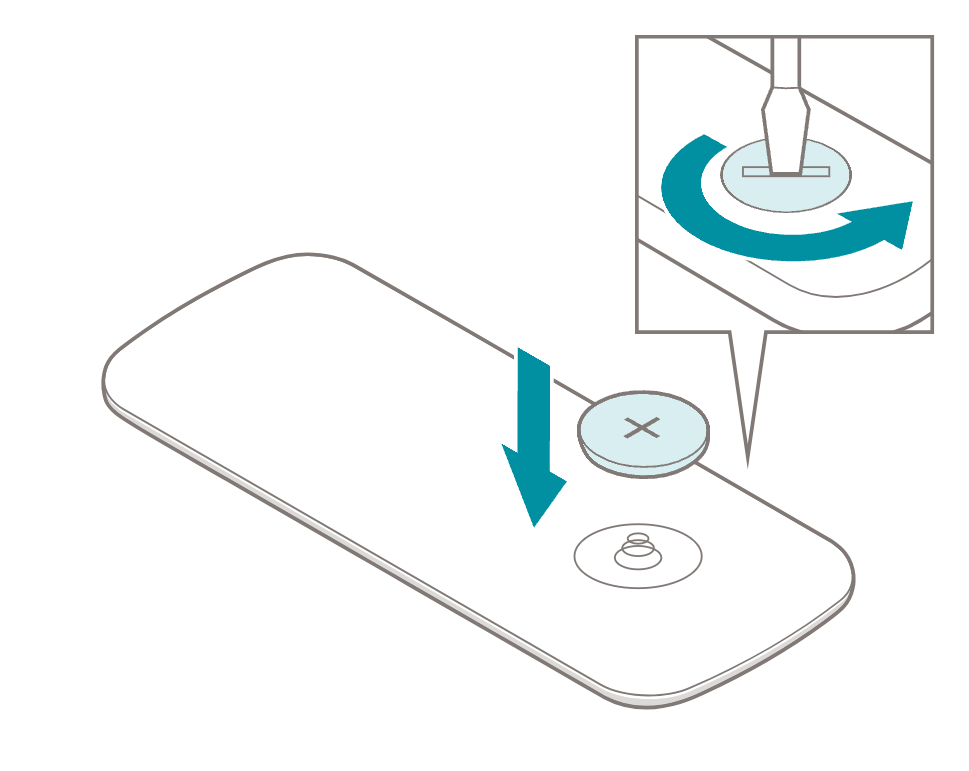
1. Open the battery compartment with a screwdriver or coin.
2. Insert the button cell battery 8 .
3. Close the battery compartment with a screwdriver or coin.
6. Use
6.1. Switching on the product
|
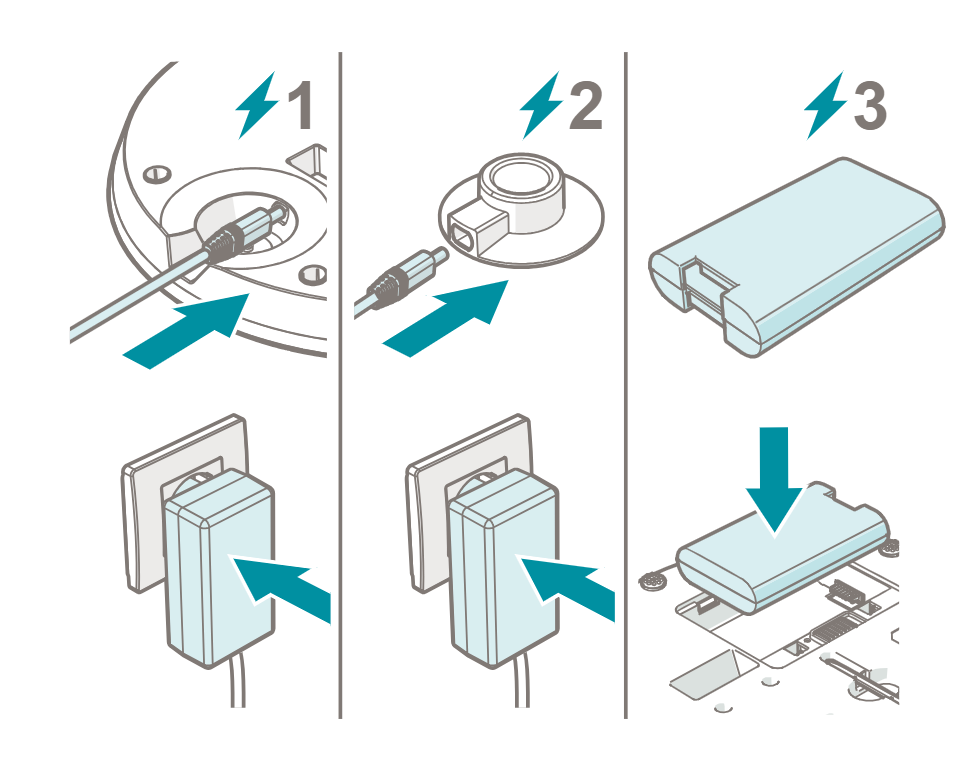
6.1.1. Powering the product via the power adapter
1. Connect the end of the power adapter u to the base unit 3 .
2. Connect the other end of the power adapter u to a power outlet.
6.1.2. Powering the product via the dock
1. Connect the end of the power adapter u to the dock 7 .
2. Connect the other end of the power adapter u to a power outlet.
3. Place the base unit 3 on the dock 7 .
6.1.3. Powering the product via the battery pack
6.2. Installing the Duux app

|
6.3. Connecting the product to Wi-Fi
1. Press and hold the power button h for 5 seconds.
2. Tap the plus icon (+) in the Duux app.
3. Search for your Duux product and tap Continue.
4. Follow the instructions in the app on how to complete the pairing process.
6.4. Using the product
|
1. Place the product upright on a stable and flat surface, at least 50 cm from other objects.
2. Press the power button h to switch on the product.
3. Press the increase or decrease button f j to change the fan speed.
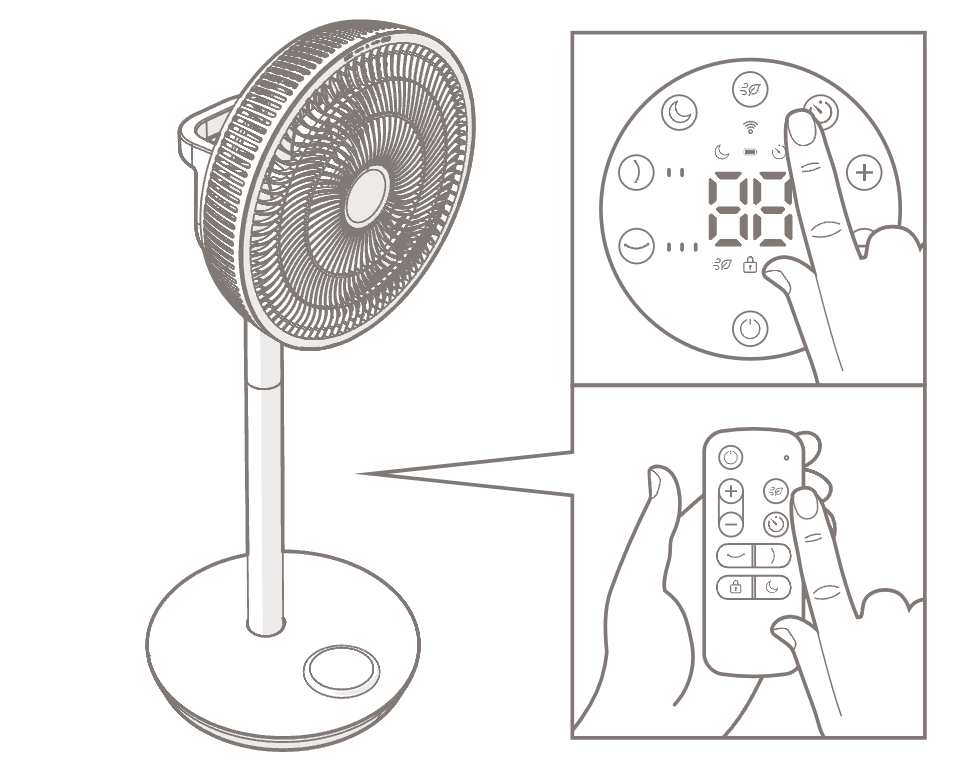
4. Press on the buttons on the control panel or remote control to select the desired function or mode.
|
|
||
|
| ||
|
| ||
|
| ||
|
|
||
|
| ||
|
| ||
6.5. Battery mode
6.5.1. Connected to mains power during operation
6.5.2. Connected to mains power during operation
6.5.3. Battery life
6.6. Child lock
6.7. Switching off the product
1. Press the power button h to switch off the product.
2. Remove the power adapter u from the power outlet.
7. Maintenance
7.1. Cleaning
|
1. Remove the screw y from the front grill q using the screwdriver o .
2. Rotate the front grill q clockwise to remove the front grill q .
3. Rotate the fan blade knob t clockwise to remove the fan blade knob t .
4. Remove the fan blade w from the motor unit 1 .
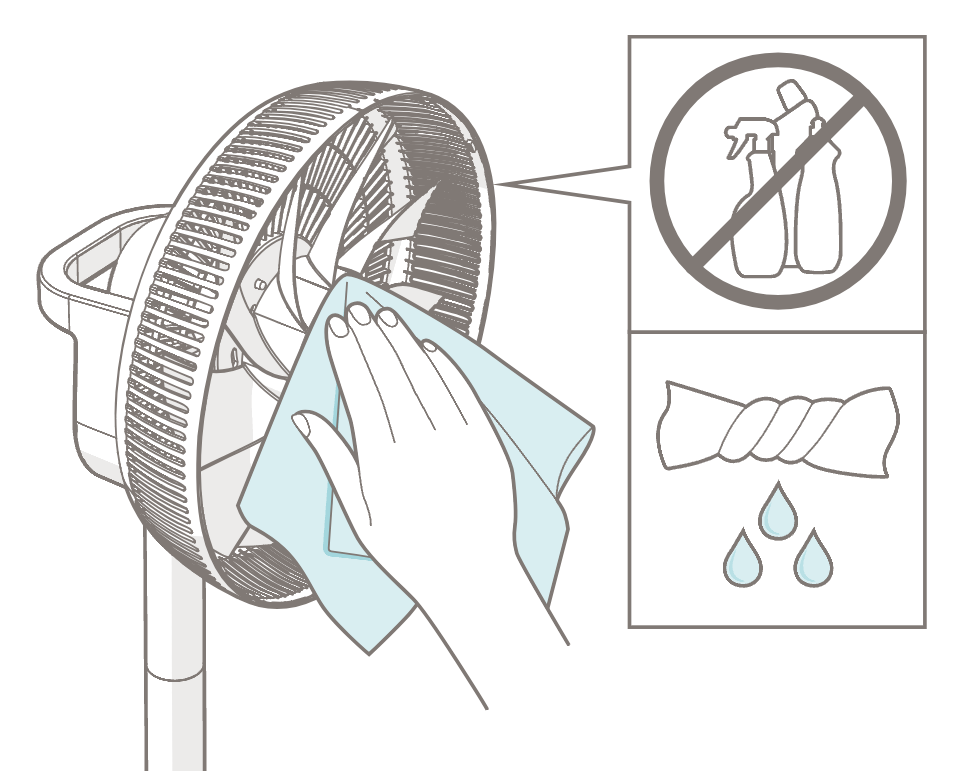
5. Clean the fan blade w and the outside of the product with a soft, slightly damp cloth.
6. Reassemble the product.
7.2. Storing
7.3. Spare parts
8. Warranty
9. Disposal
|
|
10. Technical specifications

|
||

|
||

|
||

|
||

|
||

|
||

|
||
|
|
||
11. Simplified EU declaration of conformity
1. Voorwoord
|
|
2. Over deze handleiding
2.1. Taal
3. Productoverzicht
3.1. Beoogd gebruik
3.2. Beschrijving van het product
3.3. Belangrijkste onderdelen
|
|
|
3.4. Bedieningselementen
|
|
|
3.5. Display
|
|
|
4. Veiligheidsvoorschriften
4.1. Signaalwoorden in deze handleiding
4.2. Symbolen op het product
|
|
|
|
|
|
|
|
|
|
|
|
|
|
4.3. Veiligheidswaarschuwingen en -voorschriften
5. Installatie
5.1. Plaatsen van de batterijen
|
|
1. Schuif de vergrendelknop naar links om het batterijklepje 5 te ontgrendelen.
2. Verwijder het batterijklepje 5 .
3. Plaats de batterijen i .
4. Plaats batterijklepje 5 terug. Schuif het op zijn plaats totdat je een klik hoort.
5.2. Installatie van het product
|
|
1. Kies een van de volgende productconfiguraties:
|
|
2. Plaats het achterste rooster e op de motoreenheid 1 .
3. Zet het achterste rooster e vast met de borgring r . Draai de borgring r met de klok mee.
|
|
4. Plaats het ventilatorblad w op de motoreenheid 1 .
5. Zet het ventilatorblad w vast met de knop van het ventilatorblad t . Draai de knop van het ventilatorblad t tegen de klok in.
|
|
6. Lijn de driehoek op het voorste rooster q uit met de markering op het achterste rooster e .
7. Draai het voorste rooster q tegen de klok in totdat de driehoek op één lijn is met het schroefgat op het achterste rooster e .
|
|
8. Zet het voorste rooster q vast met de schroef y met behulp van de schroevendraaier o .
5.3. Installatie van de afstandsbediening
|
|
1. Open het batterijvak met een schroevendraaier of muntstuk.
2. Plaats de knoopcelbatterij 8 .
3. Sluit het batterijvak met een schroevendraaier of muntstuk.
6. Gebruik
6.1. Het product inschakelen
|
|
6.1.1. Voeding van het product via de voedingsadapter
1. Sluit het uiteinde van de voedingsadapter u aan op het onderstel 3 .
2. Sluit het andere uiteinde van de voedingsadapter u aan op een stopcontact.
6.1.2. Voeding van het product via het dock
1. Verbind het uiteinde van de voedingsadapter u met het dock 7 .
2. Sluit het andere uiteinde van de voedingsadapter u aan op een stopcontact.
3. Plaats het onderstel 3 op het dock 7 .
6.1.3. Voeding van het product via de batterijen
6.2. Installeren van de Duux-app
|
|
6.3. Het product verbinden met wifi
1. Houd de aan/uit-knop h 5 seconden ingedrukt.
2. Tik op het plus-pictogram (+) in de Duux-app.
3. Zoek je Duux-product en tik op Doorgaan.
4. Volg de instructies in de app om de verbindingsprocedure te voltooien.
6.4. Gebruik van het product
|
|
1. Plaats het product rechtop op een stabiele en vlakke ondergrond op een afstand van minimaal 50 cm van andere voorwerpen.
2. Druk op de aan/uit-knop h om het product in te schakelen.
3. Druk op de knop verhogen of verlagen f j om de ventilatorsnelheid aan te passen.
4. Druk op de knoppen op het bedieningspaneel of de afstandsbediening om de gewenste functie of modus te selecteren.
|
|
||
|
| ||
|
| ||
|
| ||
|
|
||
|
| ||
|
| ||
6.5. Batterijmodus
6.5.1. Aangesloten op stroom tijdens inschakeling
6.5.2. Aangesloten op stroom tijdens inschakeling
6.5.3. Levensduur van de batterij
6.6. Kinderslot
6.7. Het product uitschakelen
1. Druk op de aan/uit-knop h om het product uit te schakelen.
2. Verwijder de voedingsadapter u uit het stopcontact.
7. Onderhoud
7.1. Reinigen
|
|
1. Verwijder de schroef y van het voorste rooster q met de schroevendraaier o .
2. Draai het voorste rooster q met de klok mee om het voorste rooster q te verwijderen.
3. Draai de knop van het ventilatorblad t rechtsom om de ventilatorbladknop t te verwijderen.
4. Verwijder het ventilatorblad w van de motoreenheid 1 .
5. Reinig het ventilatorblad w en de buitenkant van het apparaat met een zachte, licht vochtige doek.
6. Zet het product weer in elkaar.
7.2. Opslag
7.3. Reserveonderdelen
8. Garantie
9. Afvoer
|
|
10. Technische specificaties
|
|
||
|
|
||
|
|
||
|
|
||
|
|
||
|
|
||
|
|
||
|
|
||
11. Vereenvoudigde EU-conformiteitsverklaring
1. Vorwort
|
|
2. Über dieses Handbuch
2.1. Sprache
3. Produktübersicht
3.1. Bestimmungsgemäße Verwendung
3.2. Produkt-Beschreibung
3.3. Zentrale Bestandteile
|
|
|
3.4. Steuerung
|
|
|
3.5. Anzeige
|
|
|
4. Sicherheitshinweise
4.1. Signalwörter in diesem Handbuch
4.2. Symbole auf dem Produkt
|
|
|
|
|
|
|
|
|
|
|
|
|
|
4.3. Sicherheitshinweise und Vorschriften
5. Installation
5.1. Einsetzen des Akkusatzes
|
|
1. Schiebe die Verriegelungstaste nach links, um die Akkusatzabdeckung 5 zu entriegeln.
2. Entferne die Akkusatzabdeckung 5 .
3. Setze den Akkusatz ein i .
4. Bring die Akkusatzabdeckung 5 wieder an. Zurückschieben, bis du ein Klickgeräusch hörst.
5.2. Installation des Produktes
|
|
1. Wähle eine der folgenden Produktkonfigurationen:
|
|
2. Setze das hintere Gitter e auf die Motoreinheit 1 .
3. Sichere das hintere Gitter e mit dem Sicherungsring r . Drehe den Sicherungsring r im Uhrzeigersinn.
|
|
4. Setze den Ventilatorflügel w auf die Motoreinheit 1 .
5. Sicher den Ventilatorflügel w mit der Ventilatorflügelhalterung t . Drehe die Ventilatorflügelhalterung t gegen den Uhrzeigersinn.
|
|
6. Richte das Dreieck auf dem vorderen Gitter q an der Markierung auf dem hinteren Gitter e aus.
7. Drehe das vordere Gitter q gegen den Uhrzeigersinn, bis das Dreieck mit dem Schraubenloch auf dem hinteren Gitter e übereinstimmt.
|
|
8. Nutze den Schraubendreher o , um das vordere Gitter q mit der Schraube y zu befestigen.
5.3. Installieren der Fernbedienung
|
|
1. Öffne das Batteriefach mit einem Schraubenzieher oder einer Münze.
2. Lege die Knopfzelle 8 ein.
3. Schließe das Batteriefach mit einem Schraubendreher oder einer Münze.
6. Verwendung
6.1. Das Produkt einschalten
|
|
6.1.1. Stromversorgung des Produkts über den Netzadapter
1. Verbinde das Ende des Netzadapters u mit der Basis 3 .
2. Schließe das andere Ende des Netzteils u an eine Steckdose an.
6.1.2. Stromversorgung des Produkts über die Aufladestation
1. Stecke den Netzadapter u in die Aufladestation 7 .
2. Schließe das andere Ende des Netzteils u an eine Steckdose an.
3. Setze die Basis 3 auf die Aufladestation 7 .
6.1.3. Stromversorgung des Produkts über den Akkusatz
6.2. Installation der Duux-App
|
|
6.3. Das Produkt mit dem WLAN verbinden
1. Halte die Taste Ein-Aus h für 5 Sekunden gedrückt.
2. Tippe auf das Plus-Symbol (+) in der Duux-App.
3. Suche nach deinem Duux-Produkt und tippe auf Weiter.
4. Folge den Anweisungen in der App, um den Kopplungsvorgang abzuschließen.
6.4. Das Produkt verwenden
|
|
1. Stelle das Produkt aufrecht auf eine stabile und ebene Oberfläche mit mindestens 50 cm Abstand zu anderen Gegenständen.
2. Drücke die Taste Ein/Aus h , um das Produkt einzuschalten.
3. Drücke die Taste mehr oder weniger f j , um die Ventilatorgeschwindigkeit zu ändern.
4. Drücke auf die Tasten am Bedienfeld oder auf der Fernbedienung, um die gewünschte Funktionalität oder den gewünschten Modus auszuwählen.
|
|
||
|
| ||
|
| ||
|
| ||
|
|
||
|
| ||
|
| ||
6.5. Batteriemodus
6.5.1. Beim Betrieb mit dem Stromnetz verbunden
6.5.2. Beim Betrieb mit dem Stromnetz verbunden
6.5.3. Akkulebensdauer
6.6. Kindersicherung
6.7. Das Produkt ausschalten
1. Drücken Sie die Einschalttaste h , um das Gerät auszuschalten.
2. Ziehe das Netzteil u aus der Steckdose.
7. Wartung und Pflege
7.1. Reinigung
|
|
1. Nimm die Schraube y mit dem Schraubendreher o aus dem vorderen Gitter q heraus.
2. Drehe das vordere Gitter q im Uhrzeigersinn, um es q abzunehmen.
3. Drehe die Ventilatorflügelhalterung t im Uhrzeigersinn, um die Ventilatorflügelhalterungt abzunehmen.
4. Nimm den Ventilatorflügel w von der Motoreinheit 1 .
5. Reinige die Ventilatorflügel w und die Außenseite des Produkts mit einem weichen, leicht feuchten Tuch.
6. Das Produkt wieder zusammenbauen
7.2. Lagerung
7.3. Ersatzteile
8. Garantie
9. Entsorgung
|
|
10. Technische Angaben
|
|
||
|
|
||
|
|
||
|
|
||
|
|
||
|
|
||
|
|
||
|
|
||
11. Vereinfachte EU-Konformitätserklärung
1. Prefacio
|
|
2. Acerca de este manual
2.1. Idioma
3. Descripción general del producto
3.1. Uso previsto
3.2. Descripción del producto
3.3. Componentes principales
|
|
|
3.4. Controles
|
|
|
3.5. Pantalla
|
|
|
4. Instrucciones de seguridad
4.1. Palabras de advertencia en este manual
4.2. Símbolos del producto
|
|
|
|
|
|
|
|
|
|
|
|
|
|
4.3. Advertencias y normas de seguridad
5. Instalación
5.1. Instalación de la batería
|
|
1. Deslice el botón de bloqueo hacia la izquierda para desbloquear la tapa de la batería 5 .
2. Retire la tapa de la batería 5 .
3. Inserte la batería i .
4. Vuelva a colocar la tapa de la batería 5 . Inserte la tapa hasta que oiga un clic.
5.2. Instalación del producto
|
|
1. Elija una de las siguientes configuraciones de producto:
|
|
2. Coloque la rejilla trasera e sobre la unidad de motor 1 .
3. Asegure la rejilla trasera e con el anillo de fijación r . Gire el anillo de fijación r en el sentido de las agujas del reloj.
|
|
4. Coloque el aspa del ventilador w en la unidad de motor 1 .
5. Asegure el aspa del ventilador w con la rosca de las aspas del ventilador t . Gire la rosca de las aspas del ventilador t en sentido contrario a las agujas del reloj.
|
|
6. Alinee el triángulo de la rejilla frontal q con la marca en la rejilla trasera e .
7. Gire la rejilla frontal q en sentido contrario a las agujas del reloj hasta que el triángulo se alinee con el orificio del tornillo en la rejilla trasera e .
|
|
8. Fije la rejilla frontal q con el tornillo y utilizando el destornillador o .
5.3. Instalación del mando a distancia
|
|
1. Abra el compartimento de la pila con un destornillador o una moneda.
2. Introduzca la pila de botón 8 .
3. Cierre el compartimento de la pila con un destornillador o una moneda.
6. Uso
6.1. Encender el aparato
|
|
6.1.1. Alimentación del producto a través del adaptador de corriente
1. Conecte el extremo del adaptador de corriente u a la unidad de base 3 .
2. Conecte el otro extremo del adaptador de corriente u a una toma de corriente.
6.1.2. Alimentación del aparato a través de la base
1. Conecte el extremo del adaptador de corriente u a la base 7 .
2. Conecte el otro extremo del adaptador de corriente u a una toma de corriente.
3. Coloque la unidad de base 3 en la base 7 .
6.1.3. Alimentación del aparato a través de la batería
6.2. Instalación de la aplicación Duux
|
|
6.3. Conectar el aparato a la wifi
1. Mantenga pulsado el botón de encendido h durante 5 segundos.
2. Toque el icono más (+) en la aplicación Duux.
3. Busque su producto Duux y pulse Continuar.
4. Siga las instrucciones indicadas en la aplicación para completar el proceso de emparejamiento.
6.4. Uso del producto.
|
|
1. Coloque el aparato en posición vertical sobre una superficie estable y plana, a una distancia mínima de 50 cm de otros objetos.
2. Pulse el botón de encendido h para encender el aparato.
3. Pulse el botón de aumento o disminución f j para cambiar la velocidad del ventilador.
4. Pulse los botones del panel de control o del mando a distancia para seleccionar la función o el modo deseado.
|
|
||
|
| ||
|
| ||
|
| ||
|
|
||
|
| ||
|
| ||
6.5. Modo batería
6.5.1. Conectado a la red eléctrica durante el funcionamiento
6.5.2. Conectado a la red eléctrica durante el funcionamiento
6.5.3. Duración de la batería
6.6. Bloqueo de seguridad infantil
6.7. Apagar el aparato
1. Pulse el botón de encendido h para apagar el producto.
2. Desconecte el adaptador de corriente u de la toma de corriente.
7. Mantenimiento
7.1. Limpieza
|
|
1. Retire el tornillo y de la rejilla frontal q utilizando el destornillador o .
2. Gire la rejilla frontal q en el sentido de las agujas del reloj para retirar la rejilla frontal q .
3. Gire la rosca de las aspas del ventilador t en el sentido de las agujas del reloj para retirar la rosca de las aspas del ventilador t .
4. Retire el aspa del ventilador w de la unidad de motor 1 .
5. Limpie el aspa del ventilador w y el exterior del aparato con un paño suave y ligeramente humedecido.
6. Vuelva a montar el producto.
7.2. Conservación
7.3. Piezas de repuesto
8. Garantía
9. Eliminación
|
|
10. Especificaciones técnicas
|
|
||
|
|
||
|
|
||
|
|
||
|
|
||
|
|
||
|
|
||
|
|
||
11. Declaración de conformidad simplificada de la UE
1. Préface
|
|
2. À propos de ce manuel
2.1. Langue
3. Aperçu du produit
3.1. Utilisation prévue
3.2. Description du produit
3.3. Parties principales
|
|
|
3.4. Commandes
|
|
|
3.5. Écran
|
|
|
4. Consignes de sécurité
4.1. Mentions d’avertissement dans ce manuel
4.2. Symboles sur le produit
|
|
|
|
|
|
|
|
|
|
|
|
|
|
4.3. Avertissements de sécurité et réglementations
5. Installation de l’appareil
5.1. Installation de la batterie
|
|
1. Faites glisser le bouton de verrouillage vers la gauche pour déverrouiller le couvercle de la batterie 5 .
2. Retirez le couvercle de la batterie 5 .
3. Insérez la pile i .
4. Replacez le couvercle de la batterie 5 . Remettez-le en place jusqu’à ce que vous entendiez un clic.
5.2. Installer le produit
|
|
1. Choisissez l’une des configurations de produit suivantes :
|
|
2. Placez le réservoir d’eau e sur la base 1 .
3. Fixez la grille arrière e avec la bague de verrouillage r . Tournez la bague de verrouillage r dans le sens des aiguilles d’une montre.
|
|
4. Placez la pale du ventilateur w sur l’unité moteur 1 .
5. Fixez la pale du ventilateur w avec le bouton de la pale du ventilateur t . Tournez le bouton de la pale du ventilateur t dans le sens inverse des aiguilles d’une montre.
|
|
6. Alignez le triangle sur la grille avant q avec le repère sur la grille arrière e .
7. Faites tourner la grille avant q dans le sens inverse des aiguilles d’une montre jusqu’à ce que le triangle soit aligné avec le trou de vis sur la grille arrière e .
|
|
8. Fixez la grille avant q avec la vis y à l’aide du tournevis o .
5.3. Installer la télécommande
|
|
1. Ouvrez le compartiment à batterie avec un tournevis ou une pièce de monnaie.
2. Insérez la pile bouton 8 .
3. Fermez le compartiment à batterie avec un tournevis ou une pièce de monnaie.
6. Utilisation
6.1. Allumer le produit
|
|
6.1.1. Alimentation du produit via l’adaptateur secteur
1. Connectez l’extrémité de l’adaptateur secteur u à l’unité de base 3 .
2. Connectez l’autre extrémité de l’adaptateur électrique u à une prise de courant.
6.1.2. Alimentation du produit via la station d’accueil
1. Insérez l’adaptateur secteur u dans la station d’accueil 7 .
2. Connectez l’autre extrémité de l’adaptateur électrique u à une prise de courant.
3. Placez l’unité de base 3 sur la station d’accueil 7 .
6.1.3. Alimentation du produit via la batterie
6.2. Installation de l’application Duux
|
|
6.3. Connexion du produit du Wi-Fi
1. Appuyez sur le bouton d’alimentation h et maintenez-le enfoncé pendant 5 secondes.
2. Appuyez sur l’icône plus (+) dans l’application Duux.
3. Recherchez votre produit Duux et appuyez sur Continuer.
4. Suivez les instructions dans l’appli pour terminer le processus de couplage.
6.4. Utilisation du produit
|
|
1. Placez le produit en position verticale sur une surface stable et plate, à plus de 50 cm d'autres objets.
2. Appuyez sur le bouton d’alimentation h pour allumer le produit.
3. Appuyez sur le bouton d’augmentation ou de diminution f j pour régler la vitesse du ventilateur.
4. Appuyez sur les boutons du panneau de commande ou de la télécommande pour sélectionner la fonction ou le mode souhaité.
|
|
||
|
| ||
|
| ||
|
| ||
|
|
||
|
| ||
|
| ||
6.5. Mode batterie
6.5.1. Branché sur secteur pendant l’opération
6.5.2. Branché sur secteur pendant l’opération
6.5.3. Autonomie de la batterie
6.6. Verrouillage enfant
6.7. Éteindre le produit
1. Appuyez sur le bouton d’alimentation h pour éteindre le produit.
2. Retirez l’adaptateur secteur u de la prise de courant.
7. Maintenance
7.1. Nettoyage
|
|
1. Retirez la vis y de la grille avant q à l’aide du tournevis o .
2. Tournez la grille avant q dans le sens des aiguilles d’une montre pour retirer la grille avant q .
3. Tournez le bouton de la pale du ventilateur t dans le sens des aiguilles d’une montre pour retirer le bouton de la pale du ventilateur t .
4. Retirez la pale du ventilateur w de l’unité moteur 1 .
5. Nettoyez les pales du ventilateur w avec un chiffon doux et légèrement humide.
6. Remontez le produit.
7.2. Stockage
7.3. Pièces de rechange
8. Garantie
9. Élimination
|
|
10. Caractéristiques techniques
|
|
||
|
|
||
|
|
||
|
|
||
|
|
||
|
|
||
|
|
||
|
|
||
11. Déclaration de conformité simplifiée de l’UE
1. Forord
|
|
2. Om denne manual
2.1. Sprog
3. Produktoversigt
3.1. Anvendelsesformål
3.2. Produktbeskrivelse
3.3. Hoveddele
|
|
|
3.4. Kontrolelementer
|
|
|
3.5. Skærm
|
|
|
4. Sikkerhedsinstruktioner
4.1. Signalord i denne vejledning
4.2. Symboler på produktet
|
|
|
|
|
|
|
|
|
|
|
|
|
|
4.3. Sikkerhedsadvarsler og regulationer
5. Installation
5.1. Sådan installeres batteripakken
|
|
1. Skub låseknappen til venstre for at låse batteridækslet op 5 .
2. Fjern batteridækslet 5 .
3. Indsæt batteripakken i .
4. Sæt batteridækslet 5 tilbage. Skub dækslet tilbage på plads, indtil du hører et klik.
5.2. Sådan installeres produktet
|
|
1. Vælg en af følgende produktkonfigurationer:
|
|
2. Placer baggitteret e på motorenheden 1 .
3. Fastgør baggitteret e med låseringen r . Drej låseringen r med uret.
|
|
4. Placer ventilatorvingen w på motorenheden 1 .
5. Fastgør ventilatorvingen w med knappen til ventilatorvingen t . Drej knappen til ventilatorvingen t mod uret.
|
|
6. Justér trekanten på frontgitteret q med markeringen på baggitteret e .
7. Drej frontgitteret q mod uret, indtil trekanten flugter med skruehullet på baggitteret e .
|
|
8. Fastgør frontgitteret q med skruen y ved hjælp af skruetrækkeren o .
5.3. Installation af fjernbetjeningen
|
|
1. Åbn batterirummet med en skruetrækker eller mønt.
2. Indsæt knapcellebatteriet i 8 .
3. Luk batterirummet med en skruetrækker eller mønt.
6. Brug
6.1. Sådan tændes produktet
|
|
6.1.1. Sådan tilsluttes strøm til produktet via strømadapteren
1. Tilslut enden af strømadapteren u til basisenheden 3 .
2. Tilslut den anden ende af strømadapteren u til en stikkontakt.
6.1.2. Sådan tilsluttes strøm til produktet via dockingstationen
1. Tilslut enden af strømadapteren u til dockingstationen 7 .
2. Tilslut den anden ende af strømadapteren u til en stikkontakt.
3. Placer basisenheden 3 på dockingstationen 7 .
6.1.3. Sådan tilsluttes strøm til produktet via batteripakken
6.2. Installation af Duux-appen
|
|
6.3. Sådan tilsluttes produktet til Wi-Fi
1. Tryk på og hold tænd/sluk-knappen på h nede i 5 sekunder.
2. Tryk på plusikonet (+) i Duux-appen.
3. Søg efter dit Duux-produkt, og tryk på Fortsæt.
4. Følg instruktionerne i appen for at gennemføre parringsprocessen.
6.4. Sådan bruges produktet
|
|
1. Anbring produktet lodret på en stabil og flad overflade mindst 50 cm fra andre genstande.
2. Tryk på tænd/sluk-knappen h for at tænde produktet.
3. Tryk på knappen for at øge eller mindske f j for at ændre ventilatorens hastighed.
4. Tryk på knapperne på kontrolpanelet eller fjernbetjeningen for at vælge den ønskede funktion eller tilstand.
|
|
||
|
| ||
|
| ||
|
| ||
|
|
||
|
| ||
|
| ||
6.5. Batteritilstand
6.5.1. Tilsluttet lysnettet under drift
6.5.2. Tilsluttet lysnettet under drift
6.5.3. Batterilevetid
6.6. Børnelås
6.7. Sådan slukkes produktet
1. Tryk på tænd/sluk-knappen h for at slukke for produktet.
2. Tag strømadapteren u ud af stikkontakten.
7. Vedligeholdelse
7.1. Rengøring
|
|
1. Fjern skruen y fra frontgitteret q ved hjælp af skruetrækkeren o .
2. Drej luftindtaget q med uret for at fjerne luftindtaget q .
3. Drej ventilatorvingeknappen t med uret for at fjerne ventilatorvingeknappen t .
4. Fjern ventilatorvingen w fra motorenheden 1 .
5. Rengør ventilatorbladet w og produktets yderside med en blød, let fugtig klud.
6. Sådan samles produktet igen.
7.2. Opbevaring
7.3. Reservedele
8. Garanti
9. Bortskaffelse
|
|
10. Tekniske specifikationer
|
|
||
|
|
||
|
|
||
|
|
||
|
|
||
|
|
||
|
|
||
|
|
||
11. Forenklet EU-overensstemmelseserklæring
1. Forord
|
|
2. Om denne håndboken
2.1. Språk
3. Produktoversikt
3.1. Tiltenkt bruk
3.2. Produktbeskrivelse
3.3. Hoveddeler
|
|
|
3.4. Kontroller
|
|
|
3.5. Skjerm
|
|
|
4. Sikkerhetsinstruksjoner
4.1. Signalord i denne håndboken
4.2. Symboler på produktet
|
|
|
|
|
|
|
|
|
|
|
|
|
|
4.3. Sikkerhetsadvarsler og forskrifter
5. Installasjon
5.1. Installere batteripakken
|
|
1. Skyv låseknappen til venstre for å låse opp dekselet til batteripakken 5 .
2. Fjern dekselet til batteripakken 5 .
3. Sett inn batteripakken i .
4. Sett batteridekselet 5 tilbake. Skyv tilbake på plass til du hører et klikk.
5.2. Installasjon av produktet
|
|
1. Velg én av følgende produktkonfigurasjoner:
|
|
2. Plasser den bakre grillen e på motorenheten 1 .
3. Fest den bakre grillen e med låseringen r . Roter låseringen r med urviseren.
|
|
4. Plasser viftebladet w på motorenheten 1 .
5. Fest viftebladet w med viftebladknappen t . Roter viftebladknappen t mot urviseren.
|
|
6. Juster trekanten på den fremre grillen q med merket på den bakre grillen e .
7. Roter den fremre grillen q mot urviseren til trekanten er på linje med skruehullet på den bakre grillen e .
|
|
8. Fest den fremre grillen q med skruen y ved hjelp av vinkelskrutrekkeren o .
5.3. Installasjon av fjernkontrollen
|
|
1. Åpne batterirommet med en skrutrekker eller mynt.
2. Sett inn knappecellebatteriet 8 .
3. Lukk batterirommet med en skrutrekker eller mynt.
6. Bruk
6.1. Slå på produktet
|
|
6.1.1. Strømforsyning til produktet via strømadapteren
1. Koble enden av strømadapteren u til sokkelenheten 3 .
2. Koble den andre enden av strømadapteren u til en stikkontakt.
6.1.2. Strømforsyning til produktet via dokkingstasjonen
1. Koble enden av strømadapteren u til dokkingstasjonen 7 .
2. Koble den andre enden av strømadapteren u til en stikkontakt.
3. Plasser sokkelenheten 3 på dokkingstasjonen 7 .
6.1.3. Strømforsyning til produktet via batteripakken
6.2. Installasjon av Duux-appen
|
|
6.3. Koble produktet fra Wi-Fi
1. Trykk og hold inne strøm-knappen h i 5 sekunder.
2. Trykk på plussikonet (+) i Duux-appen.
3. Søk etter Duux-produktet og trykk på Fortsett.
4. Følg instruksjonene i appen for å fullføre sammenkoblingsprosessen.
6.4. Bruk av produktet
|
|
1. Plasser produktet oppreist på en stabil og flat overflate, minst 50 cm fra andre objekter.
2. Trykk på strøm-knappen h for å slå på produktet.
3. Trykk på øk-knappen eller reduser-knappen f j for å justere viftehastigheten.
4. Trykk på knappene på kontrollpanelet eller fjernkontrollen for å velge ønsket funksjon eller modus.
|
|
||
|
| ||
|
| ||
|
| ||
|
|
||
|
| ||
|
| ||
6.5. Batterimodus
6.5.1. Tilkoblet strømnettet under drift
6.5.2. Tilkoblet strømnettet under drift
6.5.3. Batteritid
6.6. Barnesikring
6.7. Slå av produktet
1. Trykk på strømknappen h for å slå av produktet.
2. Fjern strømledningen u fra stikkontakten.
7. Vedlikehold
7.1. Rengjøring
|
|
1. Fjern skruen y fra frontgrillen q ved hjelp av skrutrekkeren o .
2. Roter den fremre grillen q med urviseren for å fjerne den fremre grillen q .
3. Roter viftebladknotten t med urviseren for å fjerne viftebladknotten t .
4. Fjern viftebladet w fra motorenheten 1 .
5. Rengjør viftebladet w og utsiden av produktet med en myk, lettfuktet klut.
6. Montere sammen produktet.
7.2. Oppbevaring
7.3. Reservedeler
8. Garanti
9. Avhending
|
|
10. Tekniske spesifikasjoner
|
|
||
|
|
||
|
|
||
|
|
||
|
|
||
|
|
||
|
|
||
|
|
||
11. Forenklet EU-samsvarserklæring
1. Förord
|
|
2. Angående denna manual
2.1. Språk
3. Produktöversikt
3.1. Avsedd användning
3.2. Produktbeskrivning
3.3. Huvuddelar
|
|
|
3.4. Kontroller
|
|
|
3.5. Display
|
|
|
4. Säkerhetsinstruktioner
4.1. Signalord i denna manual
4.2. Symboler på produkten
|
|
|
|
|
|
|
|
|
|
|
|
|
|
4.3. Säkerhetsvarningar och föreskrifter
5. Installation
5.1. Installation av batteripaketet
|
|
1. Skjut låsknappen åt vänster för att låsa upp batterilocket 5 .
2. Ta bort batterilocket 5 .
3. Sätt i batteripaketet i .
4. Sätt tillbaka batterilocket 5 . Skjut tillbaka den på plats tills du hör ett klick.
5.2. Installation av produkten
|
|
1. Välj en av följande produktkonfigurationer:
|
|
2. Placera det bakre gallret e på motorenheten 1 .
3. Fäst det bakre gallret e med låsringen r . Vrid låsringen r medurs.
|
|
4. Placera fläktbladet w på motorenheten 1 .
5. Fäst fläktbladet w med fläktbladsknoppen t . Vrid fläktbladsknoppen t moturs.
|
|
6. Rikta in triangeln på det främre gallret q med märket på det bakre gallret e .
7. Vrid det främre gallret q moturs tills triangeln är i linje med skruvhålet på den bakre grillen e .
|
|
8. Fäst det främre gallret q med skruven y med hjälp av skruvmejseln o .
5.3. Installera fjärrkontrollen
|
|
1. Öppna batterifacket med en skruvmejsel eller ett mynt.
2. Sätt i cellbatteriet 8 .
3. Stäng batterifacket med en skruvmejsel eller ett mynt.
6. Användning
6.1. Slå på produkten
|
|
6.1.1. Produkten får ström via nätadaptern
1. Anslut strömadapterns ände u till basenheten 3 .
2. Anslut strömadapterns andra ände u till ett eluttag.
6.1.2. Produkten får ström via dockningsstationen
1. Anslut strömadapterns ände u till dockningsstationen 7 .
2. Anslut strömadapterns andra ände u till ett eluttag.
3. Placera basenheten 3 på dockningsstationen 7 .
6.1.3. Produkten får ström via batteripaketet
6.2. Installera Duux-appen
|
|
6.3. Koppla bort produkten från Wi-Fi
1. Håll strömknappen h intryckt i 5 sekunder.
2. Tryck på plusikonen (+) i Duux-appen.
3. Sök efter din Duux-produkt och tryck på Fortsätt.
4. Följ instruktionerna i appen för att slutföra parkopplingen.
6.4. Använda produkten
|
|
1. Placera produkten upprätt på en stabil och plan yta, minst 50 cm bort från andra föremål.
2. Tryck på strömbrytaren h för att slå på produkten.
3. Tryck på öka-knappen f eller minska-knappen j för att justera fläkthastigheten.
4. Tryck på knapparna på kontrollpanelen eller fjärrkontrollen för att välja önskad funktion eller läge.
|
|
||
|
| ||
|
| ||
|
| ||
|
|
||
|
| ||
|
| ||
6.5. Batteriläge
6.5.1. Ansluten till nätspänning under drift
6.5.2. Ansluten till nätspänning under drift
6.5.3. Batterilivslängd
6.6. Barnlås
6.7. Stänga av produkten
1. Tryck på strömbrytaren h för att stänga av produkten.
2. Dra aldrig i strömadaptern u för att koppla bort den från eluttaget.
7. Underhåll
7.1. Rengöring
|
|
1. Ta bort skruven y från det främre gallret q med hjälp av skruvmejseln o .
2. Vrid det främre gallret q medurs för att ta bort det främre gallret q .
3. Vrid fläktbladsknoppen t medurs för att ta bort fläktbladsknoppen t .
4. Ta bort fläktbladet w från motorenheten 1 .
5. Rengör fläktbladet w och produktens yttersida med en mjuk, lätt fuktad trasa.
6. Montera produkten igen.
7.2. Lagring
7.3. Reservdelar
8. Garanti
9. Kassering
|
|
10. Tekniska specifikationer
|
|
||
|
|
||
|
|
||
|
|
||
|
|
||
|
|
||
|
|
||
|
|
||
11. Förenklad EU-försäkran om överensstämmelse
1. Johdanto
|
|
2. Tietoja tästä käyttöoppaasta
2.1. Kieli
3. Tuotteen yleiskuvaus
3.1. Käyttötarkoitus
3.2. Tuotteen kuvaus
3.3. Pääosat
|
|
|
3.4. Säätimet
|
|
|
3.5. Näyttö
|
|
|
4. Turvallisuusohjeet
4.1. Tämän oppaan huomiosanat
4.2. Tuotteen symbolit
|
|
|
|
|
|
|
|
|
|
|
|
|
|
4.3. Turvallisuusvaroitukset ja -määräykset
5. Asentaminen
5.1. Akun asentaminen
|
|
1. Avaa akun kansi liu’uttamalla lukituspainike vasemmalle 5 .
2. Irrota akun kansi 5 .
3. Aseta akku paikalleen i .
4. Aseta akun kansi 5 takaisin. Liu’uta takaisin paikalleen, kunnes kuulet napsahduksen.
5.2. Tuotteen asentaminen
|
|
1. Valitse jokin seuraavista tuotekokoonpanoista:
|
|
2. Aseta takaritilä e moottoriyksikköön 1 .
3. Kiinnitä takaritilä e lukitusrenkaalla r . Kierrä lukitusrengasta r myötäpäivään.
|
|
4. Aseta tuulettimen lavat w moottoriyksikköön 1 .
5. Kiinnitä tuulettimen lavat w tuulettimen lapojen nupilla t . Kierrä tuulettimen lapojen nuppia t vastapäivään.
|
|
6. Kohdista eturitilän kolmio q takaritilän merkin e kanssa.
7. Käännä eturitilää q vastapäivään, kunnes kolmio on kohdistettu takaritilän ruuvireiän e kanssa.
|
|
8. Kiinnitä eturitilä q ruuvilla y käyttämällä ruuvimeisseliä o .
5.3. Kaukosäätimen asentaminen
|
|
1. Avaa paristolokero ruuvitaltalla tai kolikolla.
2. Aseta nappiparisto 8 paikalleen.
3. Sulje paristolokero ruuvitaltalla tai kolikolla.
6. Käyttö
6.1. Tuotteen käynnistäminen
|
|
6.1.1. Virransyöttö virtalähteen kautta
1. Liitä virtalähteen u pää jalustayksikköön 3 .
2. Kytke virtalähteen u toinen pää pistorasiaan.
6.1.2. Virransyöttö telakan kautta
1. Kytke virtalähteen pää u telakkaan 7 .
2. Kytke virtalähteen u toinen pää pistorasiaan.
3. Aseta jalustayksikkö 3 telakointiasemaan 7 .
6.1.3. Virransyöttö akun kautta
6.2. Duux-sovelluksen asentaminen
|
|
6.3. Tuotteen yhdistäminen Wi-Fi-verkkoon
1. Pidä virtapainiketta h painettuna 5 sekunnin ajan.
2. Napauta pluskuvaketta (+) Duux-sovelluksessa.
3. Etsi Duux-tuotteesi ja napauta Jatka.
4. Seuraa pariliitoksen muodostamista koskevia sovelluksessa näytettäviä ohjeita.
6.4. Tuotteen käyttäminen
|
|
1. Aseta tuote pystysuoraan vakaalle ja tasaiselle pinnalle ja vähintään 50 cm etäisyydelle muista esineistä.
2. Käynnistä laite painamalla virtapainiketta h .
3. Muuta tuulettimen nopeutta painamalla lisäys- tai vähennyspainiketta f j .
4. Valitse haluamasi toiminto tai tila painamalla ohjauspaneelin tai kaukosäätimen painikkeita.
|
|
||
|
| ||
|
| ||
|
| ||
|
|
||
|
| ||
|
| ||
6.5. Akkutila
6.5.1. Kytketty verkkovirtaan käytön aikana
6.5.2. Kytketty verkkovirtaan käytön aikana
6.5.3. Akun kesto
6.6. Lapsilukko
6.7. Tuotteen sammuttaminen
1. Sammuta tuote painamalla virtapainiketta h .
2. Irrota virtasovitin u pistorasiasta.
7. Kunnossapito
7.1. Puhdistus
|
|
1. Irrota ruuvi y eturitilästä q käyttämällä ruuvimeisseliä o .
2. Käännä eturitilää q myötäpäivään irrottaaksesi sen q .
3. Käännä tuulettimen lapojen nuppia t myötäpäivään irrottaaksesi nupin t .
4. Irrota tuulettimen lavat w moottoriyksiköstä 1 .
5. Puhdista tuulettimen siivet w ja tuotteen ulkopinta pehmeällä ja hieman kostealla liinalla.
6. Kokoa tuote uudelleen.
7.2. Varastointi
7.3. Varaosat
8. Takuu
9. Hävittäminen
|
|
10. Tekniset tiedot
|
|
||
|
|
||
|
|
||
|
|
||
|
|
||
|
|
||
|
|
||
|
|
||
11. Yksinkertaistettu EU-vaatimustenmukaisuusvakuutus